automation

How To: Create Automatic Deployment Rules for Patch Tuesday Software Updates

Automatic deployment of updates is one of the best features of SCCM. Automation in general is awesome.
The best way to use Automatic deployment rules (ADR) is to have them run on Patch Tuesday which is the second Tuesday of the month when Microsoft releases their updates generally before 11:00 PST/PDT (I am Australian based so I set ADRs to run Wednesday Morning).
In this example I am deploying Windows 8.1 x64 critical, security and 'updates' updates.
1. Under the Software Library Node Software Updates click Automatic Deployment Rules then select 'Create Automatic Deployment Rule' from the Ribbon

2. In the Wizard name your ADR 'ADR: Windows 8.1 x64 Updates'
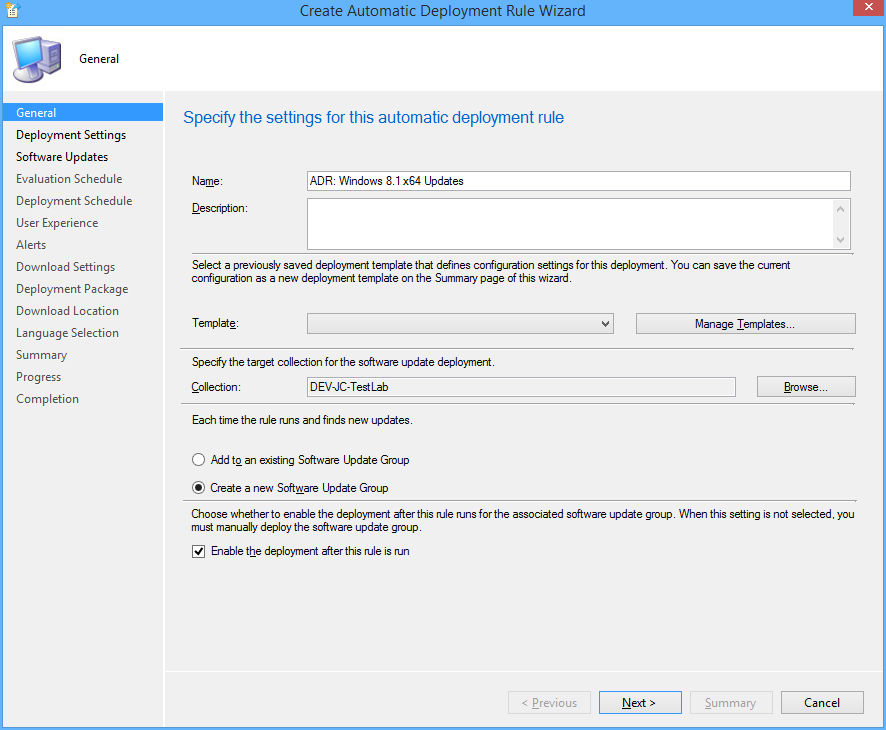
3. Click Browse and select your target collection
4. Change the Option to 'Create a new Software Update Group'. The other Option should really be called 'Wipe previous updates from Software Update Group' as that's what it does.
5. Click Next.
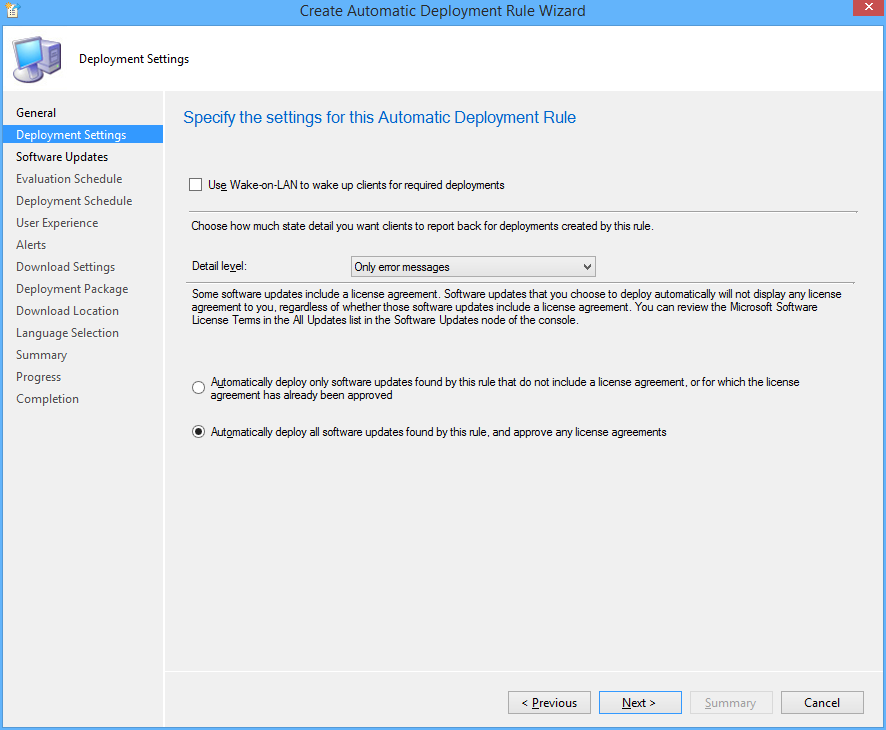
6. Ensure 'Automatically deploy all software updates found by this rule, and approve any license agreements. Also optionally enable the Wake-on-LAN tickbox.
7. Click Next
8. Choose Date Released or Revised, set it to Last 3 weeks.
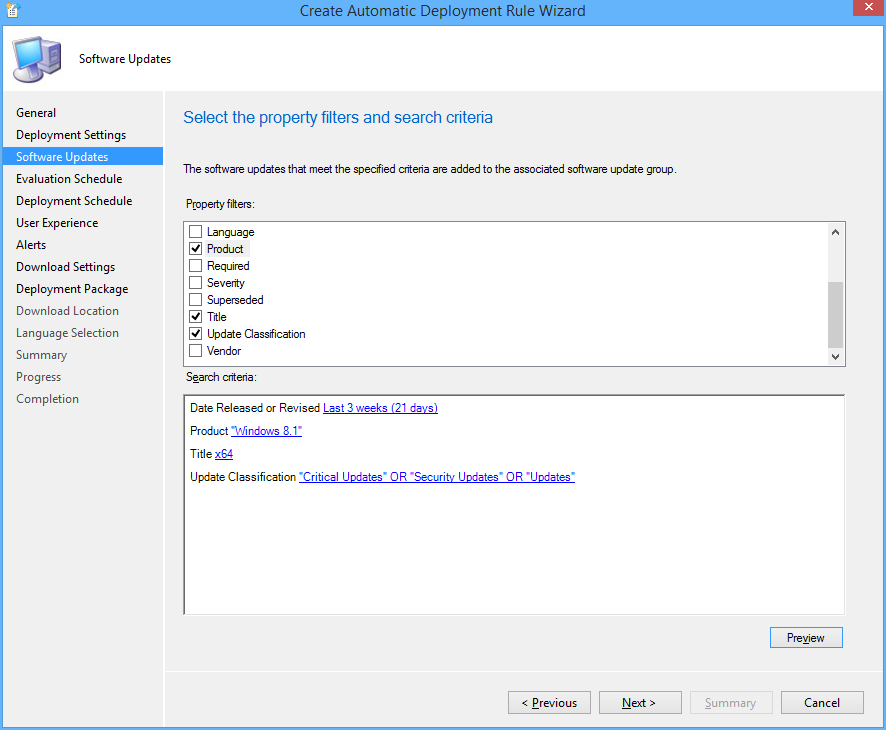
9. Choose Product, set it to 'Windows 8.1'
10. Choose Update Classification, set it to “Critical Updates” OR “Security Updates” OR
“Updates”
11. Choose Title, set it to 'x64'. This is to filter out x86 updates.
12. Click Preview, if you are doing this on Patch Tuesday you will see all the applicable updates that will be deployed. Otherwise you can change the date range for the example.

13. Click Next
14. Choose 'Run the rule on a schedule.

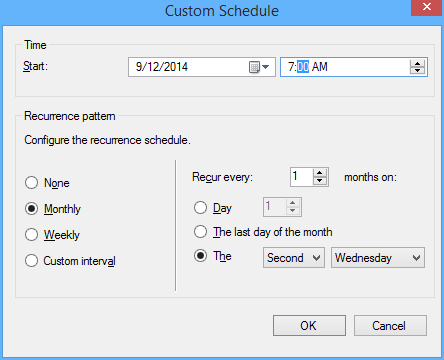
15. Click Customize and choose to run the rule every second Tuesday at the appropriate time depending what time zone you are in. Click OK (Not to important for the demo as you can run it manually)
16. Click Next
17. Customize the Deadline to 'As soon as possible'.
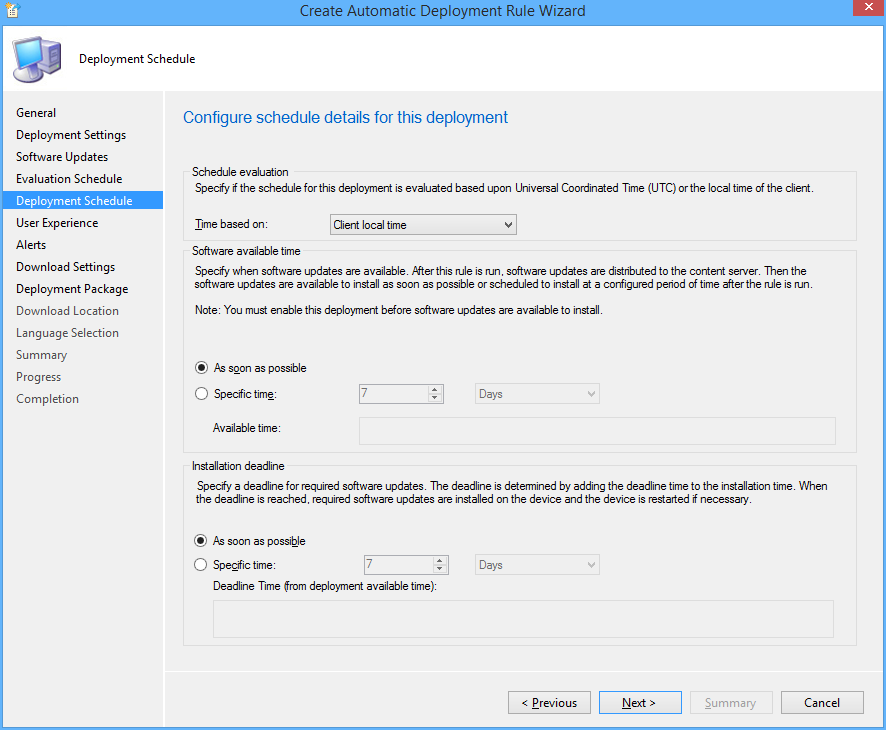
18. Click Next
19. Change the User Experience to 'Display in Software Center and show all notifications'
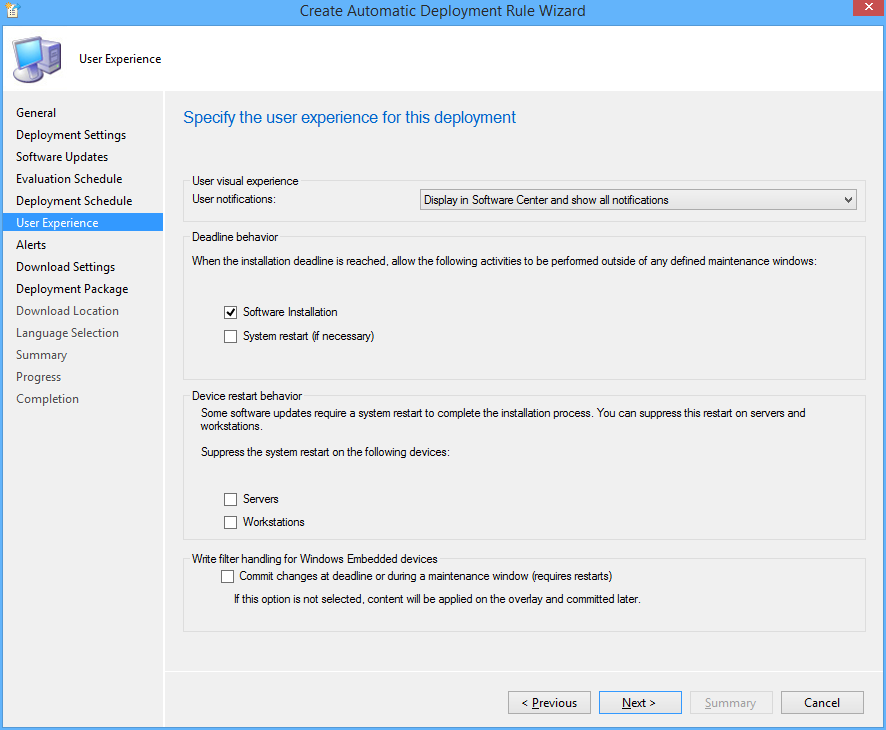
20. Tick 'Software Installation'.
21. Click Next.
22. Click Next.
23. Click Next
24. Choose Create a new deployment package.
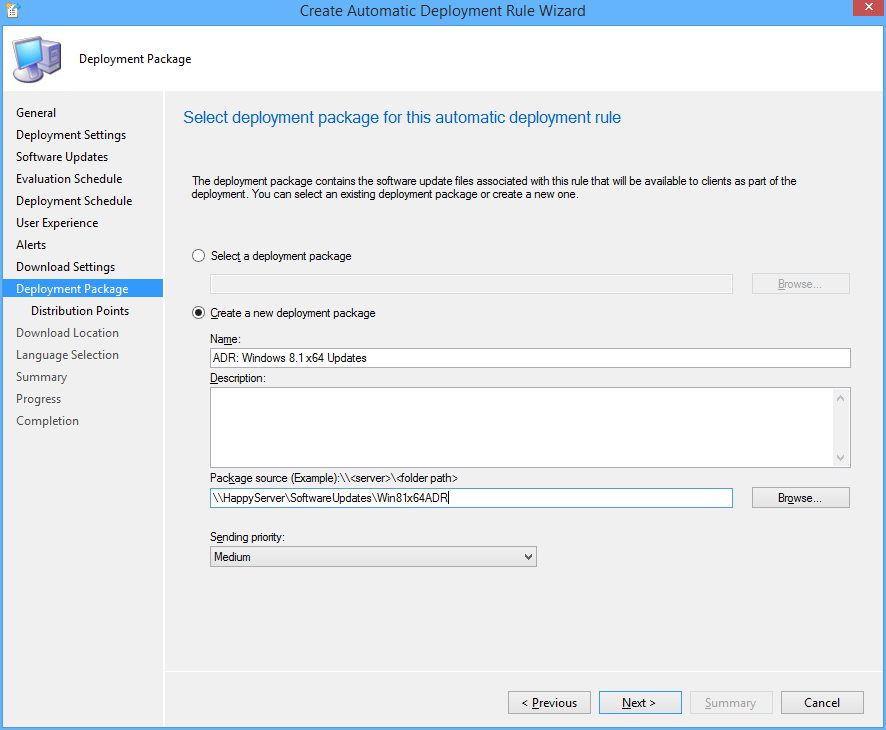
25. Name it 'ADR: Windows 8.1 x64 Updates' and select a UNC share for storage of the software updates.
26. Add Distribution Points.
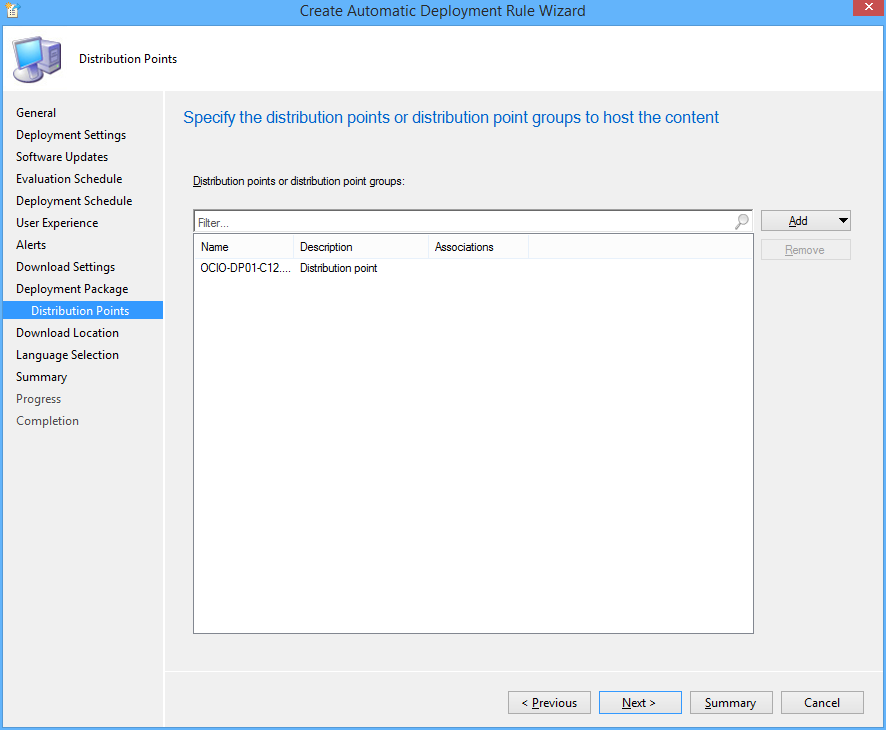
27. Click Next.
28. Click Next
29. Select desired languages, click Next

30. Click Next, then Close.
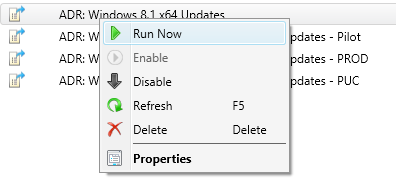
31. Right click on your newly created ADR and click 'Run Now'. You can monitor progress on the site server checking Program FilesMicrosoft Configuration ManagerLogsruleengine.log
32. Give it some time to download updates and distribute them then on the client machine run a machine policy update and verify updates install using Software Center

33. After having a play check out this post for some best practices to setting up all your Automatic Deployment Rules including Piloting your updates to a pilot group for 7 days.
34. Also check out this post to automate sending a report out on what updates are being deployed.
KB: Temporary partition to stage boot wim on UEFI booted devices fails.
When not using the latest version of bootable media and the system is not partitioned SCCM is meant to create a temporary partition to stage the correct boot wim. What actually happens is it just creates 1 big NTFS partition.
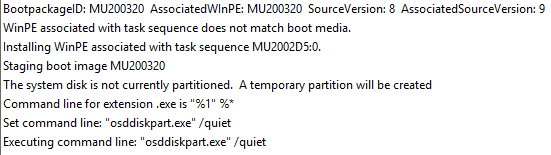
What actually happens is it just creates 1 big NTFS partition.

Then it checks the for a system partition and bombs out.

http://technet.microsoft.com/en-au/library/hh824839.aspx states that the System partition must be formatted FAT32, SCCM is formatting it NTFS so it never gets recognised as a system partition.
For UEFI the EFI & MSR volume should also be created to make system partition readable and bootable.
I created a hotfix request, will update this post if anything comes of it.

Create a compliance baseline to remove a folder

In this example we are killing the Silverlight start menu folder enabling us to use the Windows Updates while keeping the start menu clean.
Create the Configuration Item
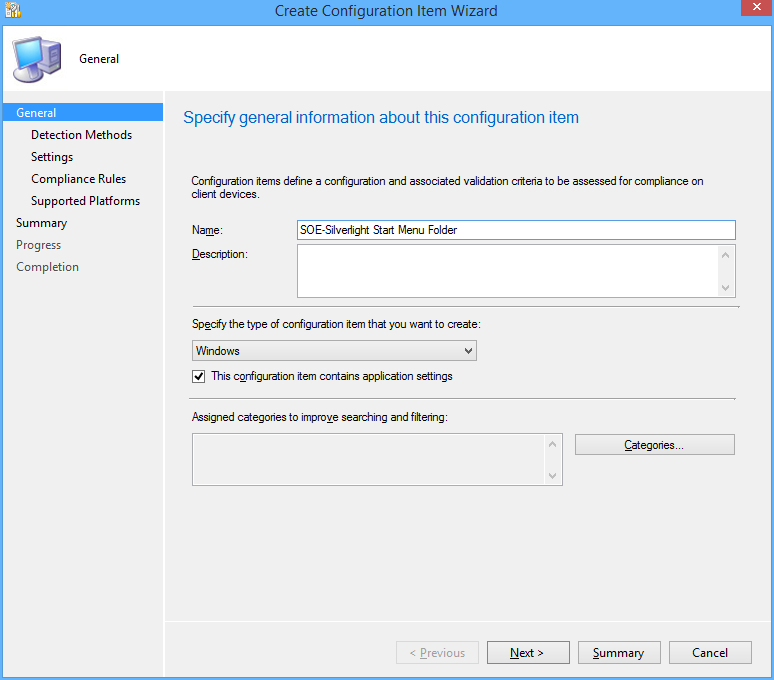
1. In the console click Create Configuration Item
2. Name your configuration item, click 'This configuration item contains application settings' and click Next
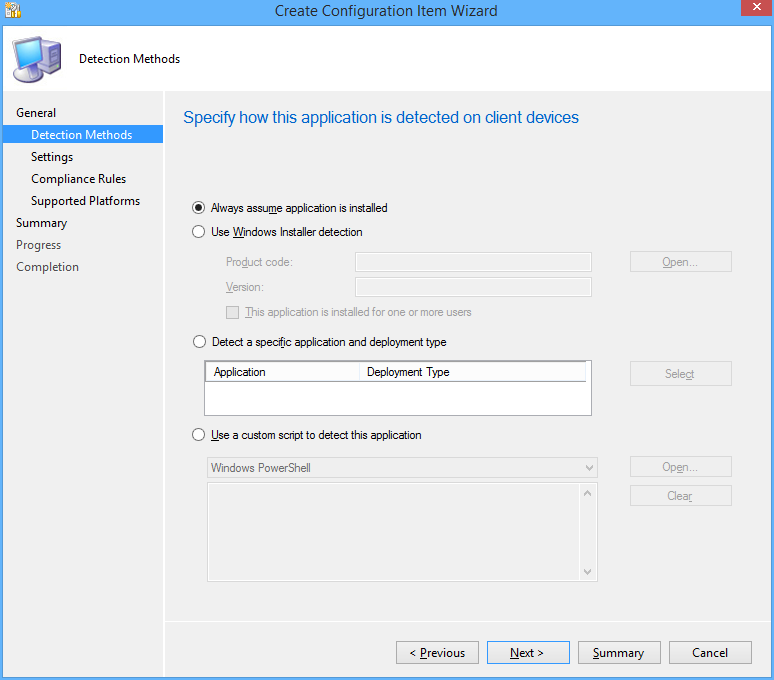
3. Select 'Always assume application is installed' and click Next
4. Click New, Change the Setting type to 'Script'. Change the Data type to 'String'. Also name your Setting.
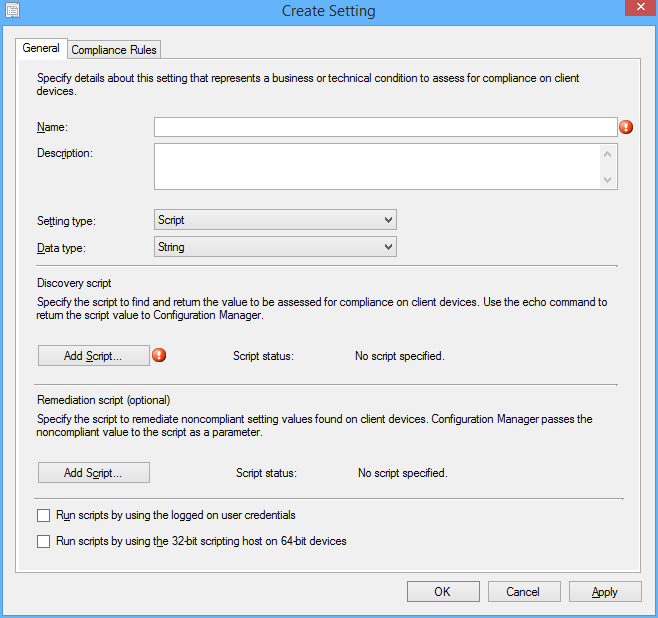
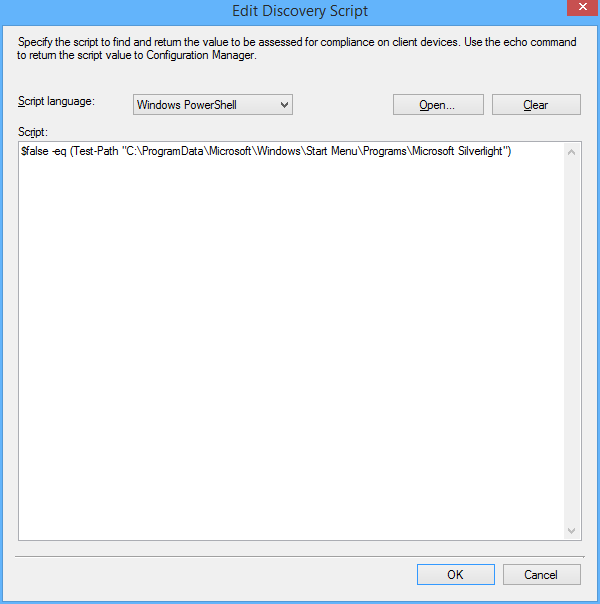
5. Under Discovery Script click 'Add Script'
6. Ensure Script language is 'Windows Powershell' and paste the following
$false -eq (Test-Path "C:ProgramDataMicrosoftWindowsStart MenuProgramsMicrosoft Silverlight")
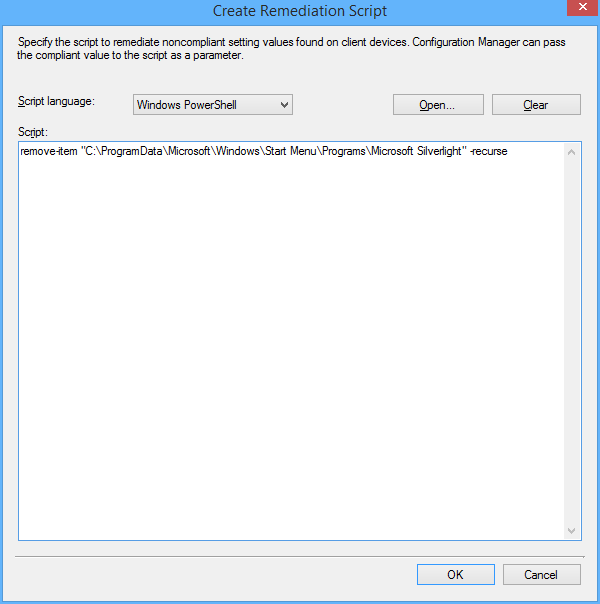
7. Under Remediation Script click 'Add Script'
8. Ensure Script language is 'Windows Powershell' and paste the following
remove-item "C:ProgramDataMicrosoftWindowsStart MenuProgramsMicrosoft Silverlight" -recurse
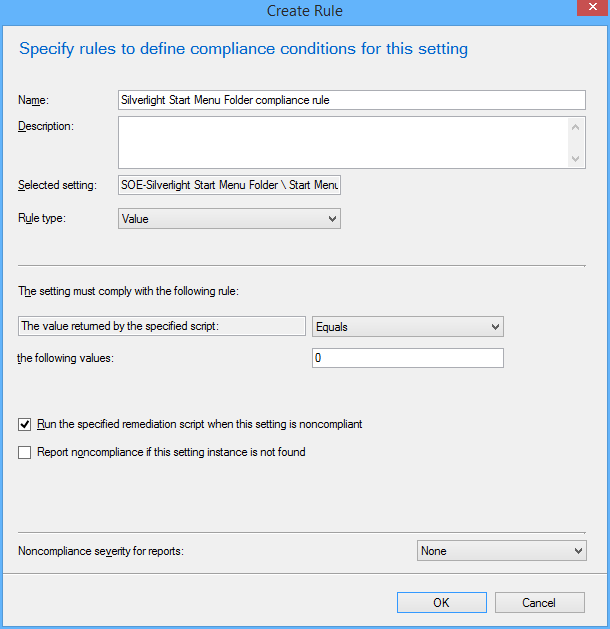
9. Click 'Ok', then click the 'Compliance Rules' tab
10. Click 'New'
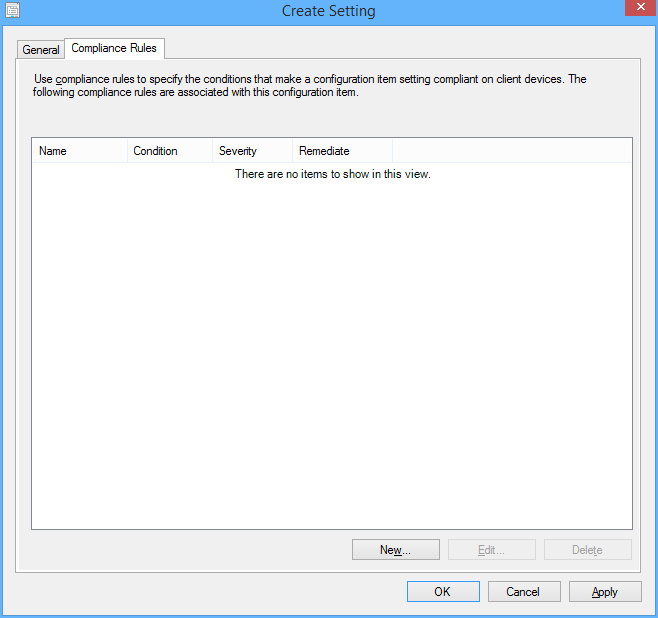
11. Configure the Compliance rule: Set 'Rule type' to Value. Set the Value returned to equal 0. Click 'Run the specified remediation script when this setting is non complaint'.
12. Click 'OK' then 'Next', 'Next' on the Wizard Screen.
13. Choose the OS Environments for compliance
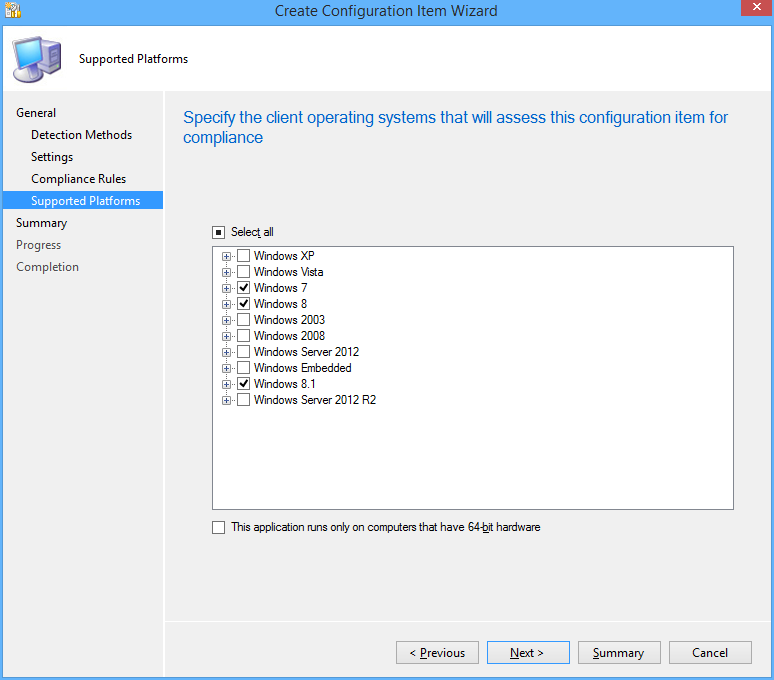
14. Click 'Next' until you finish the Wizard.
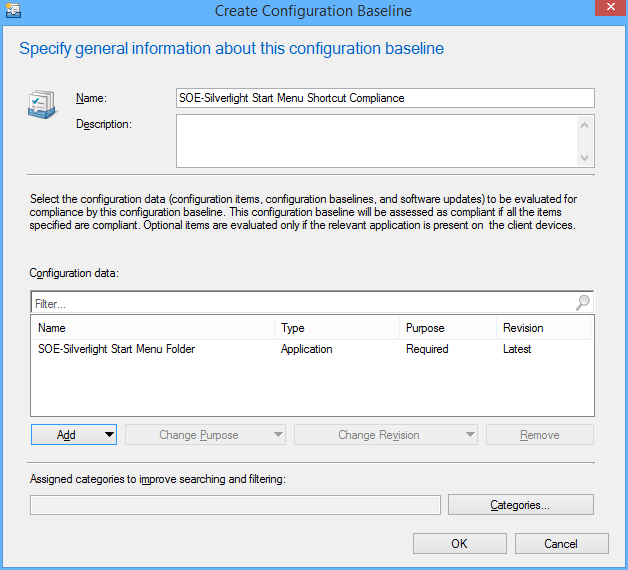
15. Under Configuration Baselines click 'Create Configuration Baseline' and add the configuration item we just created, then click 'OK'
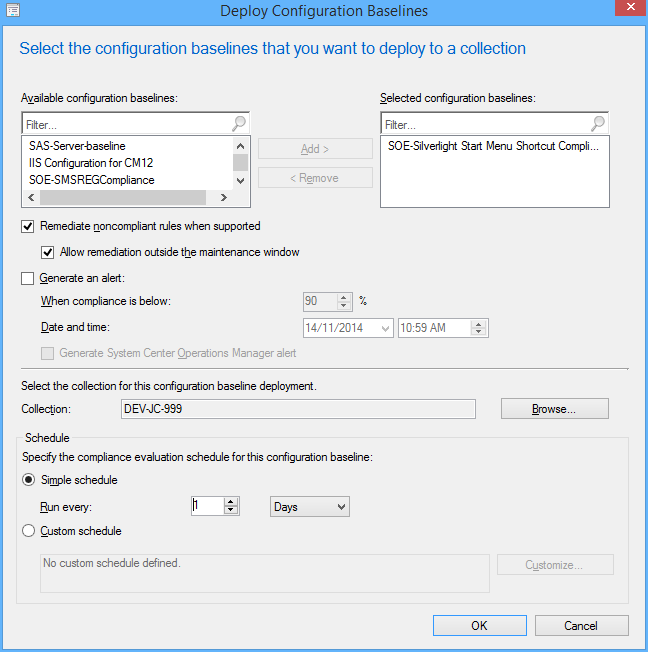
16. The Baseline is now ready to be deployed to your test collection!
Right click and select Deploy, Enable the remediation options and change the Schedule if needed.
17. On your test machine, request a new machine policy, then click on the Components tab. Clicking Refresh should show the new baseline which you can then evaluate.
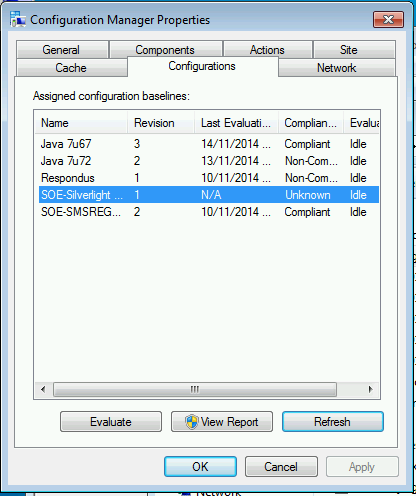
18. Within a minute the remediation runs and the folder disappears!

Optimize the 'build and capture' time and size (SCCM Build)
Inspired by Johan's post http://www.deploymentresearch.com/Research/tabid/62/EntryId/174/Building-reference-images-like-a-boss.aspx
I am probably one of the few that uses SCCM to capture base images. I use it because I create a thick image and it keeps the history of packages that it has installed meaning that newly imaged machines will know that they have already installed software x when they recieve it's required deployment.
Patch the install.wim
Patching the default Windows 7 install.wim so it doesn't need to install as many updates during OSD.
1. Download WSUS Offline Update from http://download.wsusoffline.net/
2. Extract to C:wsusoffline and run UpdateGenerator.exe
3. Choose Windows 7 x64 Global and click start.
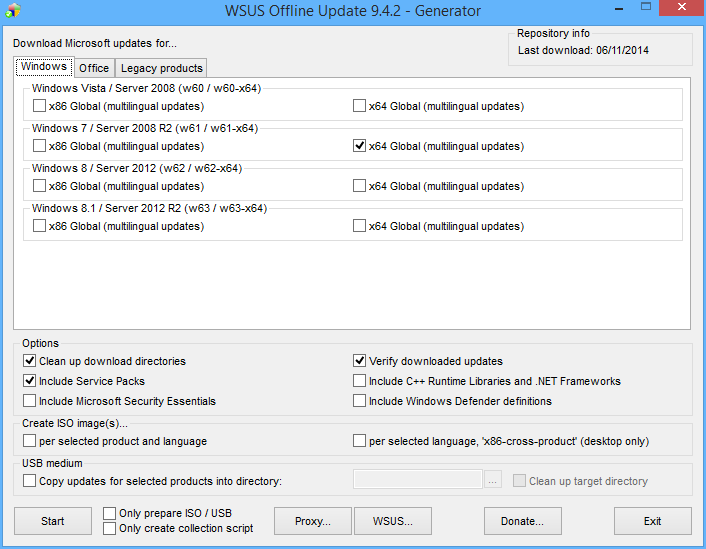
4. Important: Delete KB2506143, KB2533552 and KB2819745 from C:wsusofflineclientw61-x64glb if they exist. They break the wim. If your company hasn't deployed IE11 also delete patches for it.
5. Extract a Win7 SP1 Enterprise ISO to 'C:OS Windows 7 SP1 x64'
6. Create the dir C:mount
7. Mount the wim -
dism /mount-wim /wimfile:"C:OS Windows 7 SP1 x64sourcesinstall.wim" /mountdir:C:mount /index:1
8. Patch the wim -
dism /image:C:mount /Add-Package /PackagePath:C:wsusofflineclientw61-x64glb
9. Commit/Close the wim -
dism /unmount-wim /mountdir:C:mount /commit
10. Copy the 'OS Windows 7 SP1 x64' folder to an unc share and import into SCCM under Operating System Installers.
Use Mikael Nystrom's Cleanup Script
1. Download via http://deploymentbunny.com/2014/06/05/nice-to-know-get-rid-of-all-junk-before-sysprep-and-capture-when-creating-a-reference-image-in-mdt/
2. Place in a UNC Share.
3. Copy ZTIUtility.vbs from MDT 2013 to the UNC Share.
4. Modify Action-CleanupBeforeSysprep.wsf second line to reference the ZTIUtility.vbs in the same folder
<script language="VBScript" src="ZTIUtility.vbs"/>
5. Create a package in SCCM.
6. Before the capture steps create a run command step surrounded by 2 reboots:
cscript.exe Action-CleanupBeforeSysprep.wsf using the package created and disable 64-bit file system redirection

The updated wim will have the patches required for this step.
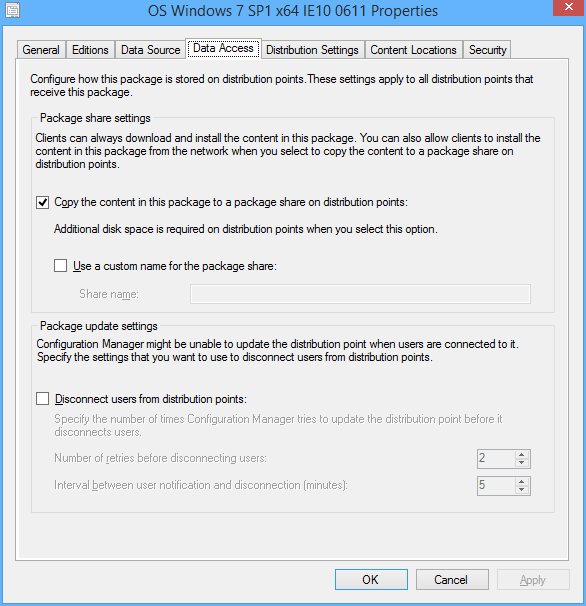
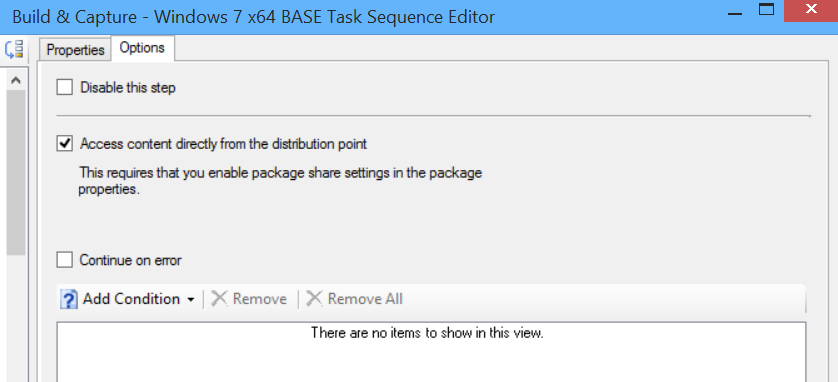
Access the wim directly from the distribution point
For this to work you need to tick the checkbox on the OS Installer properties to copy to a share, then also the Access content directly in the task sequence Apply OS step.
Monitor KB2894518 for mutiple reboot updates
http://support.microsoft.com/kb/2894518
Create a separate deployment for these updates to a collection that excludes your capture VMs
Tweak your Virtual Machine
- Don't use the Legacy Network adapter (Have had issues at capture stage)
Visit http://www.deploymentresearch.com/Research/tabid/62/EntryId/174/Building-reference-images-like-a-boss.aspx for VM tweaks
- Use 2 vCPUs
- Use a RAM Disk
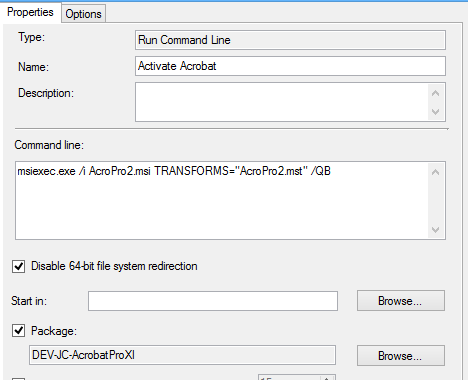
Fix for customized Adobe CC Acrobat in base image not activated
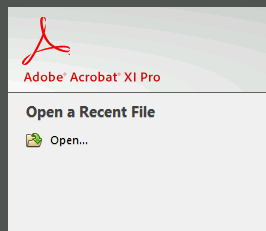
If you put Adobe Acrobat in the base image using the steps from http://helpx.adobe.com/creative-cloud/packager/deploying-acrobat.html
Install Customization Wizard XI msi + mst then Install CC package msi and mst you may find it not activated.
To fix this during the OS Deployment add a run command line step to reinstall the CC package mst and mst.
A normal install program step fails....
Versioning and naming your base SOE .wim during OSD
If you replace the base wim (via build and capture) frequently it can be good to set versions and date the wim file that you import. It makes it easy to revert back if a change didn't go so well. Below are the steps in my build and capture to do versioning and work around a bug with naming your captured image.
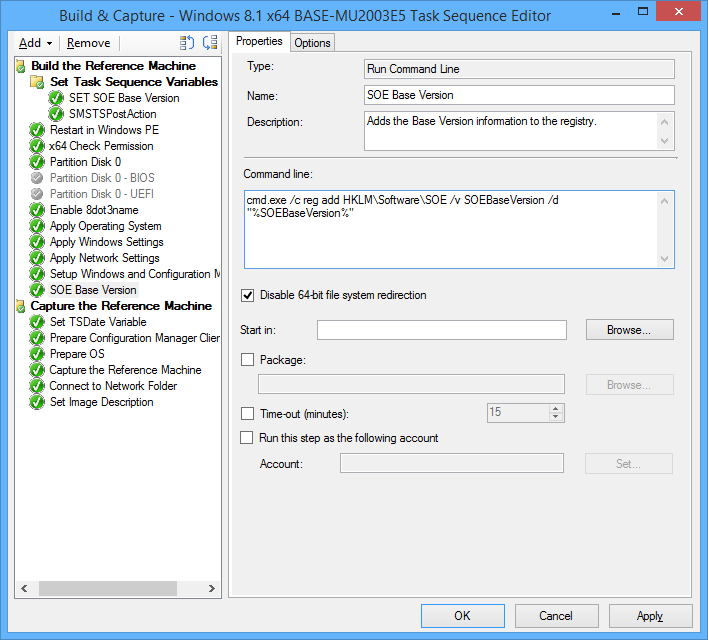
1. At the top of my task sequence I set a task sequence variable SOEBaseVersion, each time I do a build and capture this is incremented.
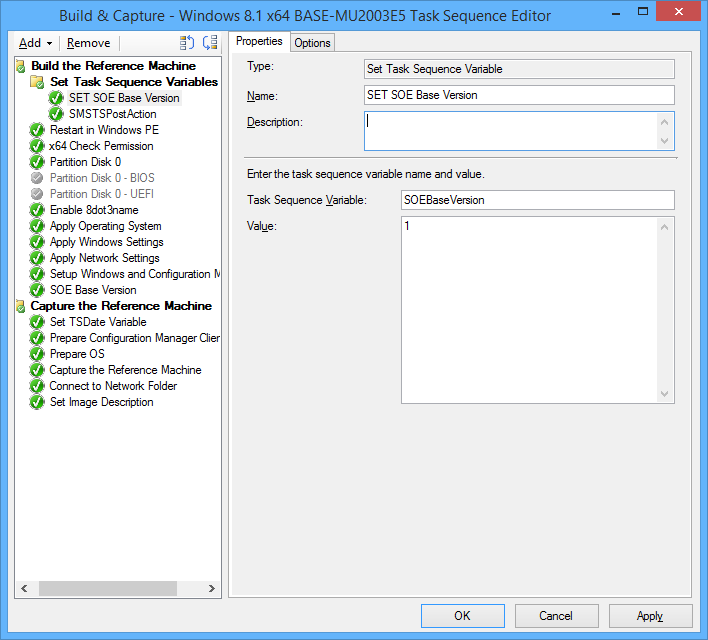
2. After 'Setup Windows and Configuration Manager' I have a 'Run Command Line' step with the following command so that we can utilize that value on deployed machines if ever needed:
cmd.exe /c reg add HKLMSoftwareSOE /v SOEBaseVersion /d "%SOEBaseVersion%"
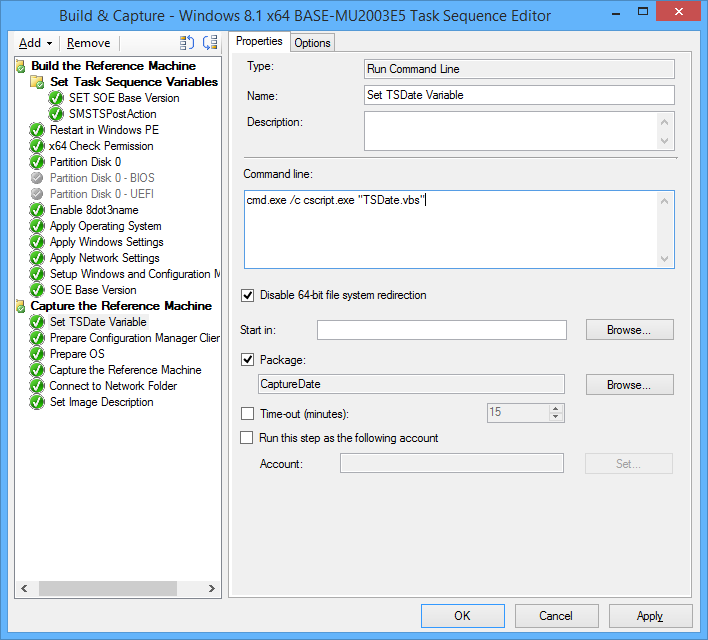
3. Next I run a vbscript to set the task sequence variable TSDate to the date in the format YYYYMMDD
Set env = CreateObject("Microsoft.SMS.TSEnvironment")
env("TSDate") = DatePart("yyyy",Date) & Right("0" & DatePart("m",Date), 2) & Right("0" & DatePart("d",Date), 2)
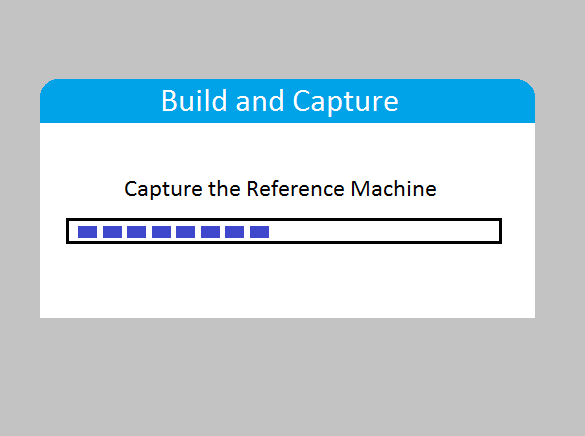
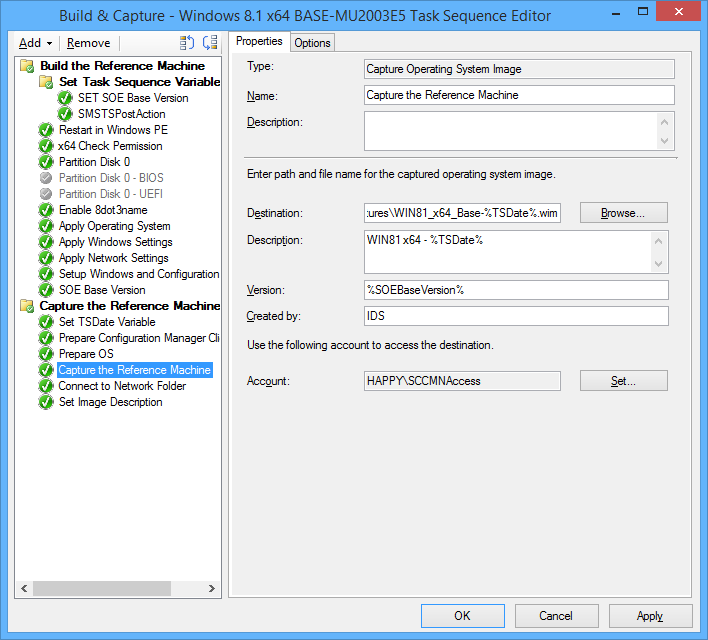
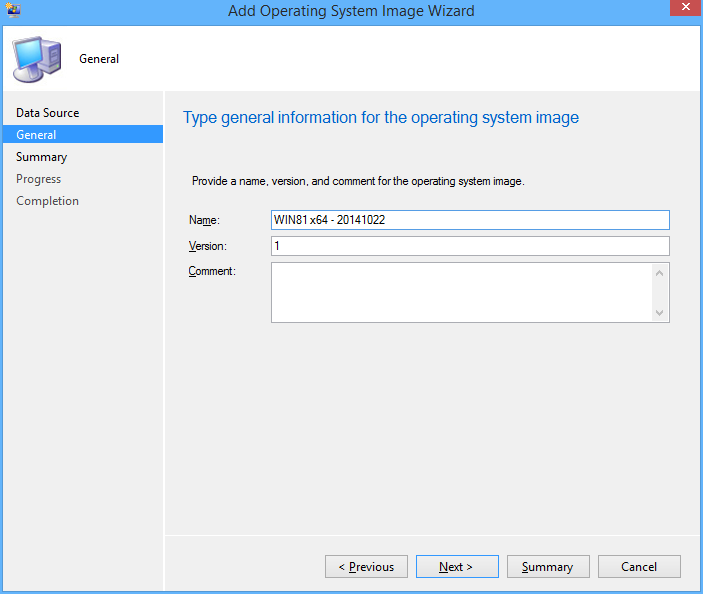
4. In the 'Capture the Reference Machine' step I can then use the TSDate Variable to create a unique file name for the capture and also use the version field. There is a bug with the SCCM console as it doesn't use the Description field when importing, the next 2 steps resolve that.
5. Connect to OS Capture share.

6. Copy imagex to a package, then use it to run the following command line
imagex.exe /info R:\WIN81_x64_Base-%TSDate%.wim 1 "Windows 8.1 Enterprise" "WIN81 x64 - %TSDate%"
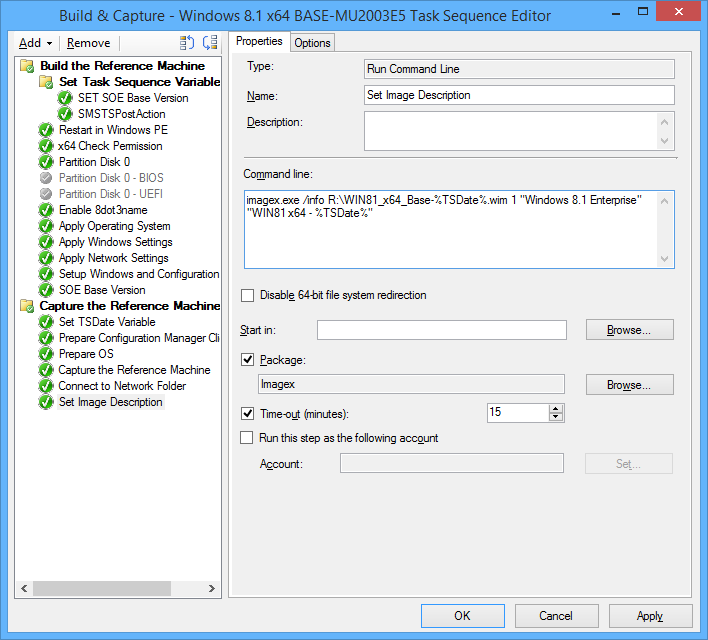
7. You can now import into SCCM with all the fields filled in correctly
Deploy Windows 10 Preview with SCCM 2012 R2 (Unsupported)
Johan Arwidmark and Niall Brady have posted guides on deploying Windows 10 Preview injecting the Windows 10 version of Dism during the task sequence.
Adding custom programs to the Set Default Programs UI
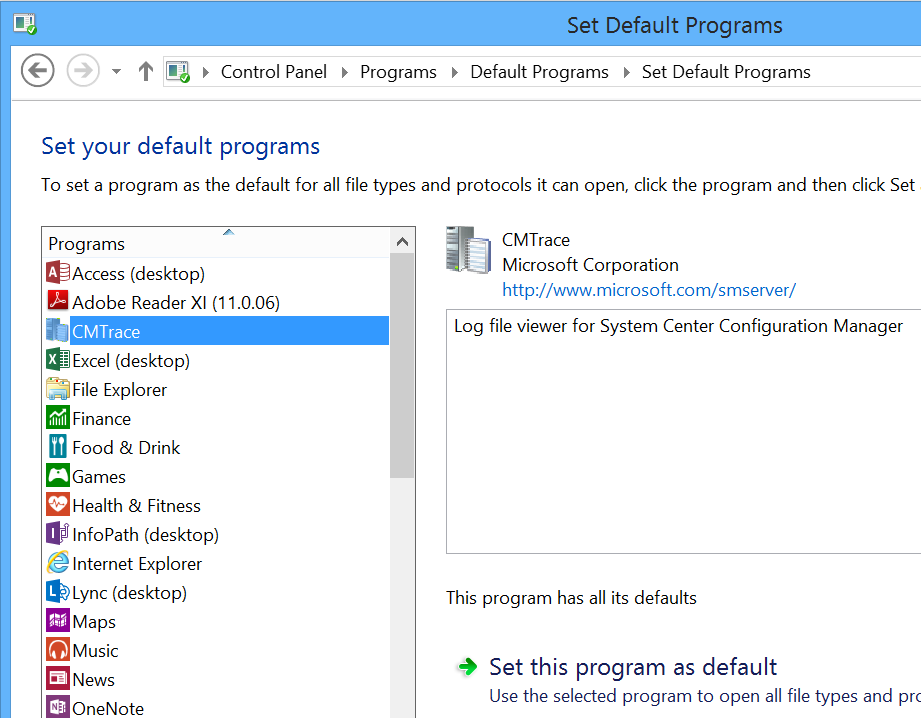
Hi, today I wanted the CMTrace tool to be recognised in the Set Default Programs control panel applet. There is a bit of information on the net but it's confusing.
In the registry you can set the program, launch arguments, file types and icon. This can be used for any app by modifying the reg file.
Once added you may like to use DISM.exe to extract your chosen defaults and import during your task sequence.
Modular Task Sequence groups - Just an idea
Maik Koster has created a really good tool that monitors/ keeps backup of task sequence changes
expanding from this it may be possible to mark groups of your task sequences as modules. So say when a task sequence changes the script would then record the xml changes of that module group and replace in all task sequences where it is used. It would be perfect for the apply driver steps.
I haven't really worked it all out as I don't have many task sequences for it to be super useful and it would be a bit to hacky. I hope Microsoft can implement modules and version control in the next release of ConfigMgr.
Add a Right Click Copy Folder or File path menu option in Windows Explorer
SCCM ConfigMgr doesn't like quotes around paths when adding packages or Wims, etc so the secret shh shift + right click copy as path isn't that handy.
Here's a reg file to add a special right click option for ConfigMgr