software updates

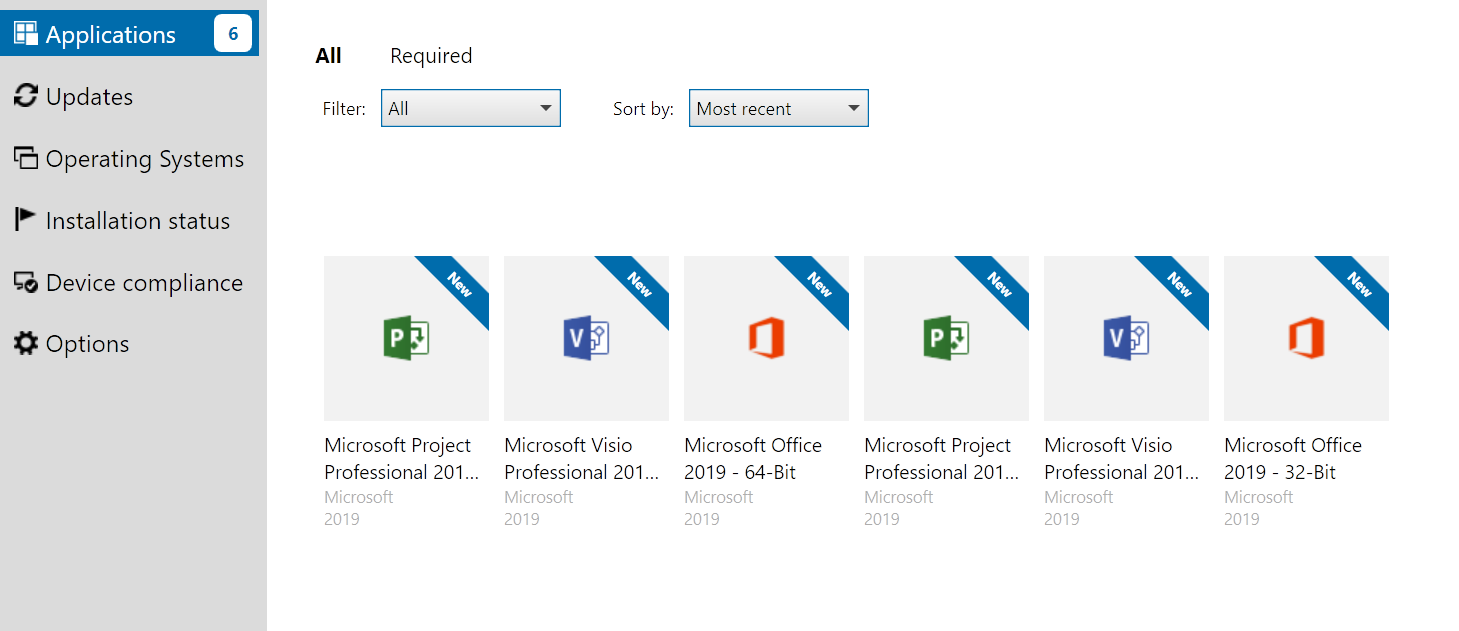
Deploying Office 2019 VL
Office 2019 now uses click-to-run technology instead of 'setup /admin' there are a few changes, probably for the best in the long run.
Create Config Files
First you need to download to Office Deployment tool
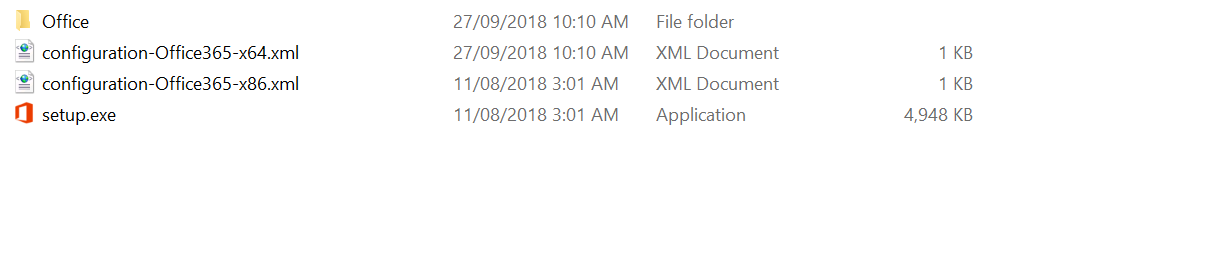
This is a self extracting file that spits out setup.exe and 2 sample config files - one for 32-bit and one for 64-bit.
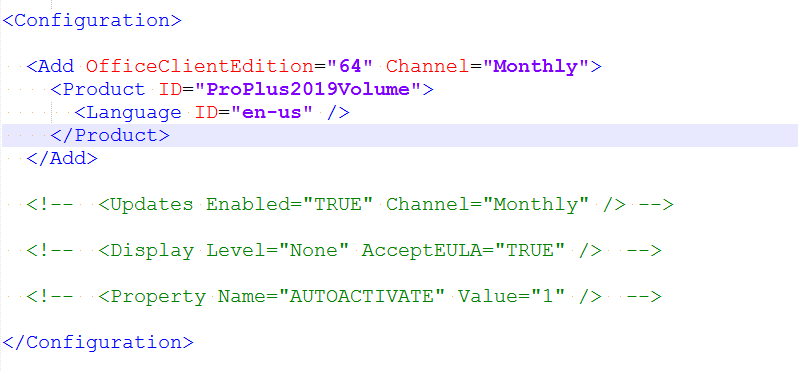
Edit the edition you want to download. If you want the Volume License version change the Product ID to 'ProPlus2019Volume'
You don't need to add Visio or Project as they are also downloaded.
Save the file and run 'setup.exe /download configuration-Office365-x64.xml'.
This will run in the background and download into a subfolder - Office.
Now you have the files you can make configurations using these resources
https://config.office.com/ - Spits out config files for Office 365 - At time of writing it isn't made for 2019 yet but should work ok.
https://docs.microsoft.com/en-gb/DeployOffice/office2019/deploy - Documentation on customising the confiuration files.
If you want a head start I've made config files for Office, Project and Visio - Download
Example - Office 32-Bit, exclude OneDrive and Skype, accept EULA, Silent install, some customisations from Config.office.com

Test
To test your config files run setup.exe with the configure switch
setup.exe /configure configuration-OfficeProPlus-x86.xml
Deploy
Create an application in SCCM - with your files.
Deployment type - Script Installer
For Detection Methods:
Office - 32-Bit: %ProgramFiles(x86)%\Microsoft Office\root\Office16\Winword.exe
Office - 64-Bit: %ProgramFiles%\Microsoft Office\root\Office16\WINWORD.EXE
Project - 32-Bit: %programfiles(x86)%\Microsoft Office\root\Office16\WINPROJ.EXE
Project - 64-Bit: %ProgramFiles%\Microsoft Office\root\Office16\WINPROJ.EXE
Visio - - 32-Bit: %programfiles(x86)%\Microsoft Office\root\Office16\VISIO.EXE
Project - 64-Bit: %ProgramFiles%\Microsoft Office\root\Office16\VISIO.EXE
KMS
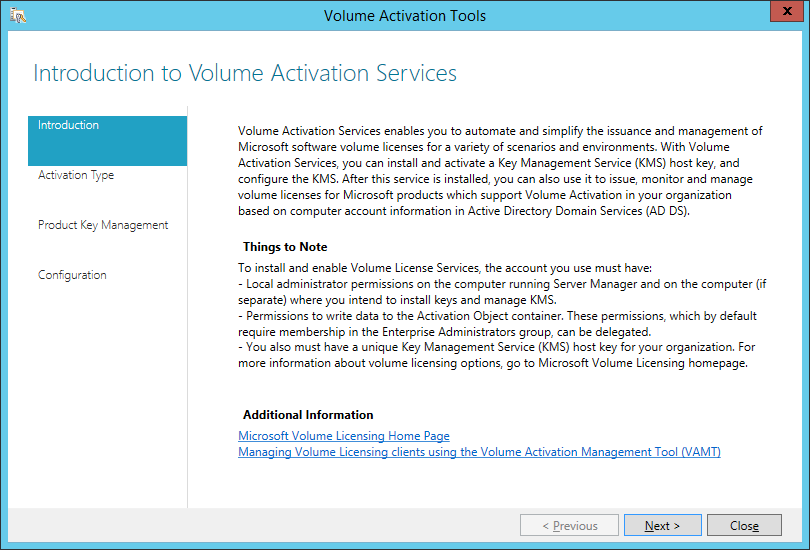
Download the Volume license app http://www.microsoft.com/downloads/details.aspx?FamilyID=878fef7e-3f4d-4d22-a423-f447c0f5bfdd
On the KMS server run the exe.
Follow the Wizard Prompts
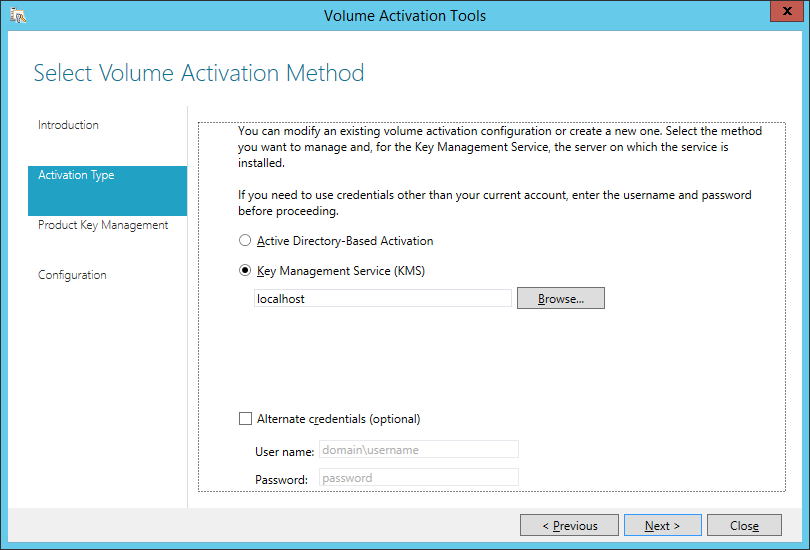
Get your Office 2019 KMS Key from your Key Holder
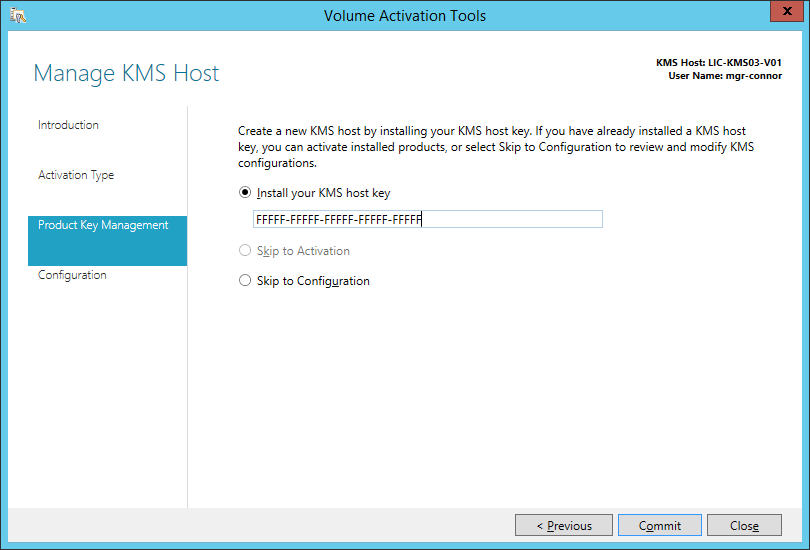
Don't Click Commit! Click Cancel as you already have this configured

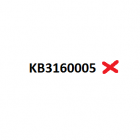
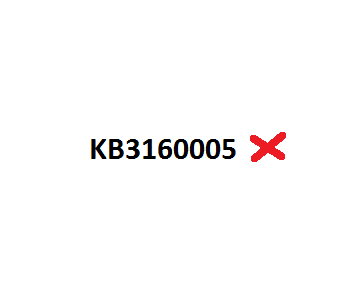
Build and Capture fails if KB3160005 IE sec cumulative update is installed
Update: Adding more scratch space to the boot wim seems to have resolved the problem on Windows 10, Windows 7 seems to still have issues.
Update: This update is also in Windows 10 CU 3163018, causing the same error. No workaround yet
If your build and capture is failing at the capture step make sure you don't have the cumulative Security Update for IE11 KB3160005. It's somehow stopping the registry load part of the step.
|
1 2 3 4 5 6 7 8 9 10 11 12 |
The task sequence execution engine failed executing the action (Capture the Reference Machine) in the group (Capture the Reference Machine) with the error code 2147943850 Action output: ... software" into HKLM\OfflineRegistry1 RegLoadKey( oRegKeyHKLM, sRegKey, sRegHivPath), HRESULT=800705aa (e:\qfe\nts\sms\framework\osdcore\offlineregistry.cpp,68) LoadHive( szPathBuffer, m_sRegKeySoftware, m_oRegKeySoftware ), HRESULT=800705aa (e:\qfe\nts\sms\framework\osdcore\offlineregistry.cpp,190) m_oOfflineRegistry.Init(pszSystemRoot), HRESULT=800705aa (e:\qfe\nts\sms\framework\osdcore\offlineos.cpp,737) rDefaultOs.initialize(sTargetSystemRoot), HRESULT=800705aa (e:\nts_sccm_release\sms\client\osdeployment\capturesystemimage\capturesystemimage.cpp,613) VerifySystemForCapture(DefaultOs), HRESULT=800705aa (e:\nts_sccm_release\sms\client\osdeployment\capturesystemimage\capturesystemimage.cpp,859) Finished with error code 0x800705AA Failed to load "C:\WINDOWS\system32\config\software" (0x800705aa). Failed to load the offline SOFTWARE registry (0x800705aa). Failed to validate for capture. nsufficient system resources exist to complete the requested service. (Error: 800705AA; Source: Windows). The operating system reported error 2147943850: Insufficient system resources exist to complete the requested service. |
Creating Collections to deploy ConfigMgr client updates (the easy way)
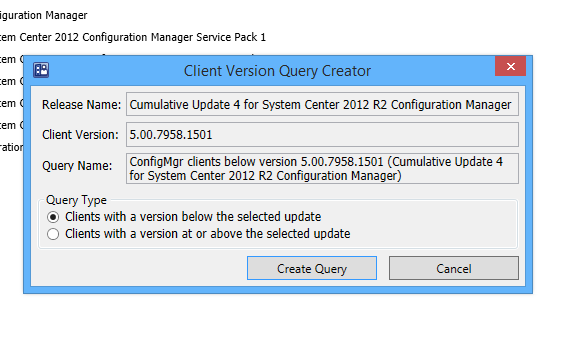
Get the Servicing Exstension from Microsoft NOW as it does all the work!!! http://blogs.technet.com/b/configmgrteam/archive/2014/12/09/now-available-microsoft-system-center-2012-configuration-manager-servicing-extension.aspx
Once you have this, in the Admin node, there's a site servicing section -> client targeting. You click 'Create Query' and it makes a nice query for your collections.

Then you go about creating your collection.
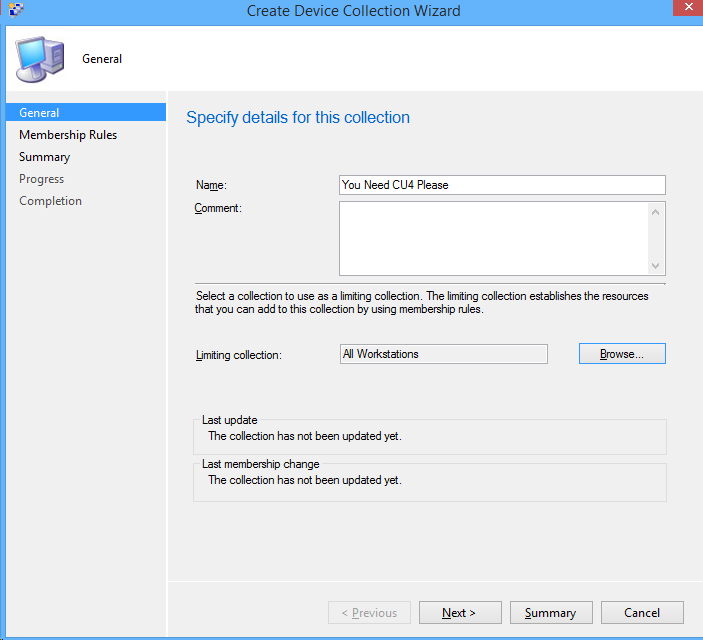
click next. Select Add Rule -> Query Rule
Click Import Query Statement and choose the nice query microsoft made for you.
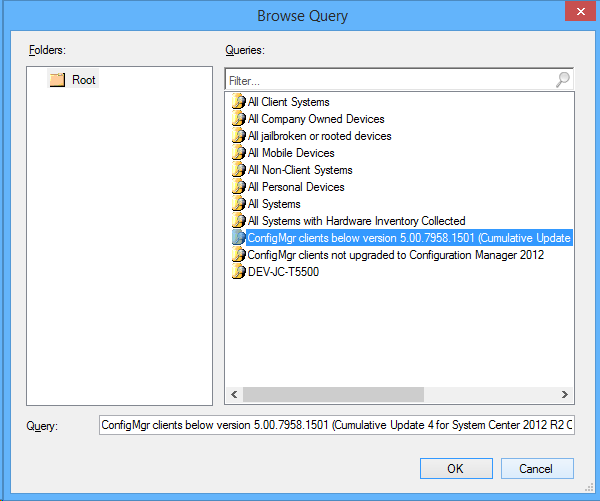
Deploy the cumulative update to the clients.

How To: Create Automatic Deployment Rules for Patch Tuesday Software Updates

Automatic deployment of updates is one of the best features of SCCM. Automation in general is awesome.
The best way to use Automatic deployment rules (ADR) is to have them run on Patch Tuesday which is the second Tuesday of the month when Microsoft releases their updates generally before 11:00 PST/PDT (I am Australian based so I set ADRs to run Wednesday Morning).
In this example I am deploying Windows 8.1 x64 critical, security and 'updates' updates.
1. Under the Software Library Node Software Updates click Automatic Deployment Rules then select 'Create Automatic Deployment Rule' from the Ribbon

2. In the Wizard name your ADR 'ADR: Windows 8.1 x64 Updates'
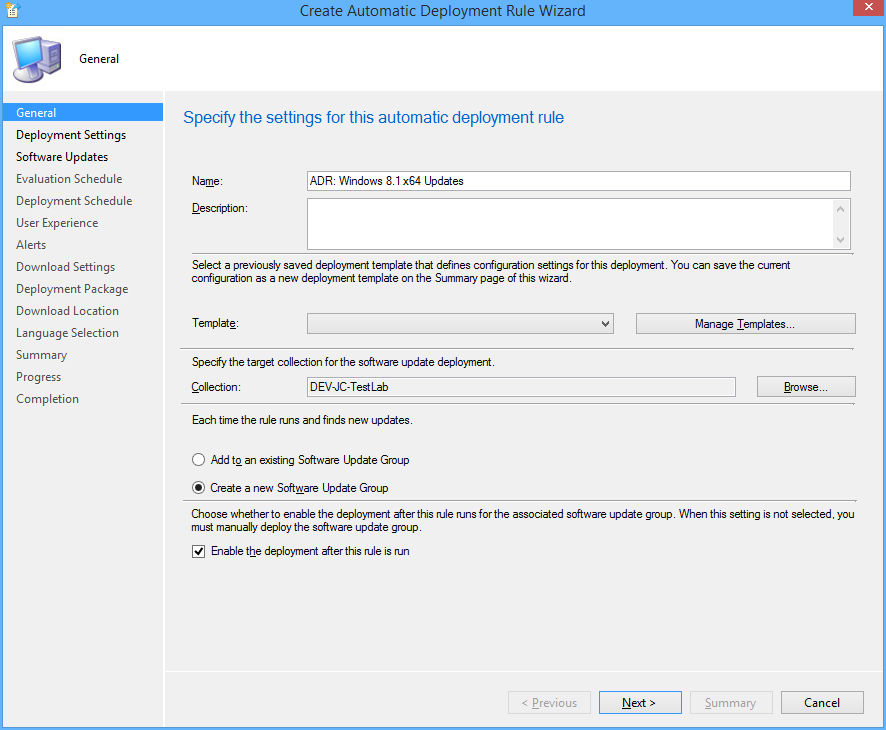
3. Click Browse and select your target collection
4. Change the Option to 'Create a new Software Update Group'. The other Option should really be called 'Wipe previous updates from Software Update Group' as that's what it does.
5. Click Next.
6. Ensure 'Automatically deploy all software updates found by this rule, and approve any license agreements. Also optionally enable the Wake-on-LAN tickbox.
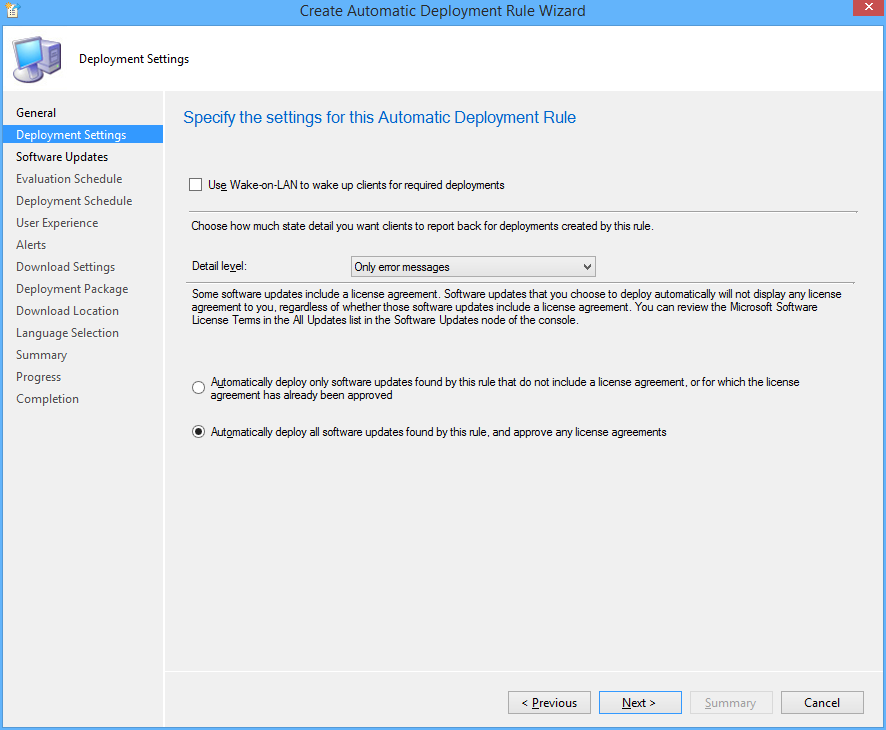
7. Click Next
8. Choose Date Released or Revised, set it to Last 3 weeks.
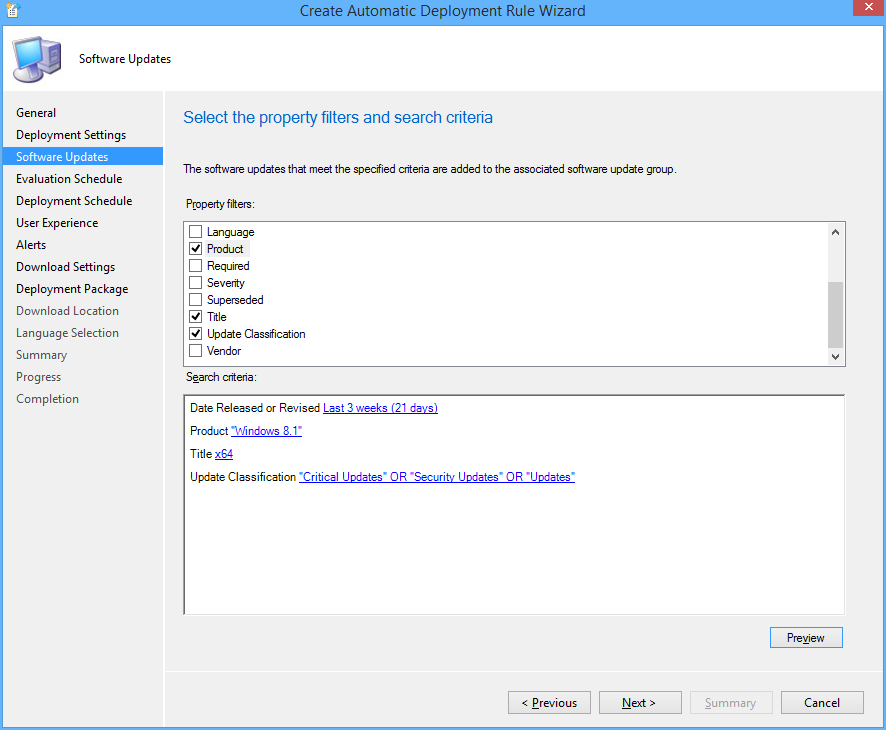
9. Choose Product, set it to 'Windows 8.1'
10. Choose Update Classification, set it to “Critical Updates” OR “Security Updates” OR
“Updates”
11. Choose Title, set it to 'x64'. This is to filter out x86 updates.
12. Click Preview, if you are doing this on Patch Tuesday you will see all the applicable updates that will be deployed. Otherwise you can change the date range for the example.

13. Click Next
14. Choose 'Run the rule on a schedule.

15. Click Customize and choose to run the rule every second Tuesday at the appropriate time depending what time zone you are in. Click OK (Not to important for the demo as you can run it manually)
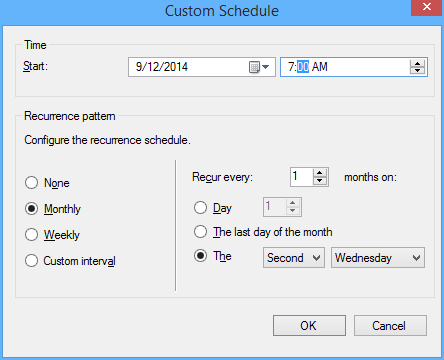
16. Click Next
17. Customize the Deadline to 'As soon as possible'.
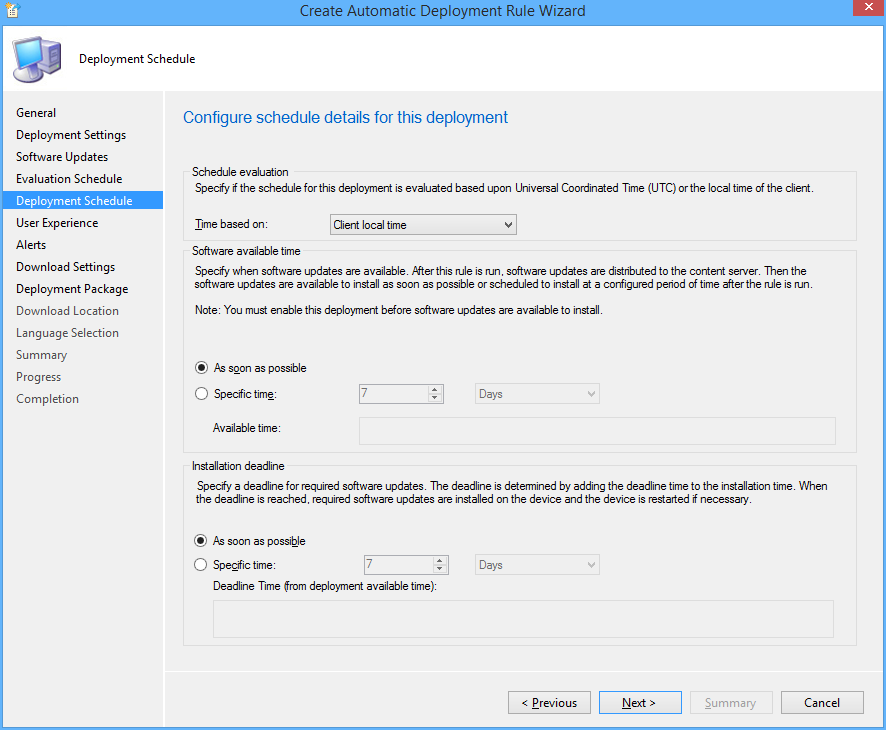
18. Click Next
19. Change the User Experience to 'Display in Software Center and show all notifications'
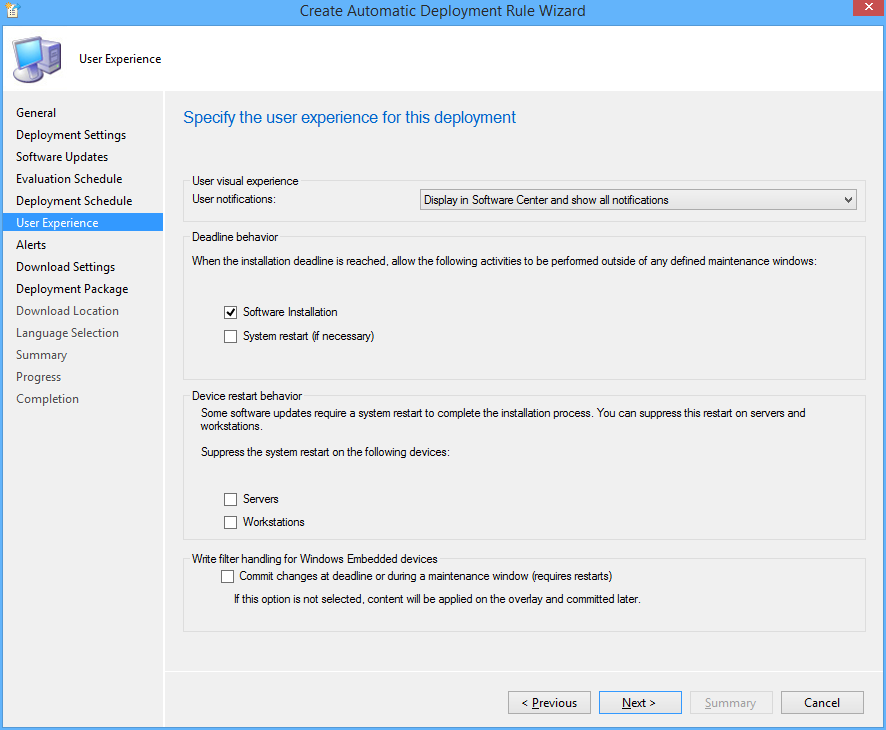
20. Tick 'Software Installation'.
21. Click Next.
22. Click Next.
23. Click Next
24. Choose Create a new deployment package.
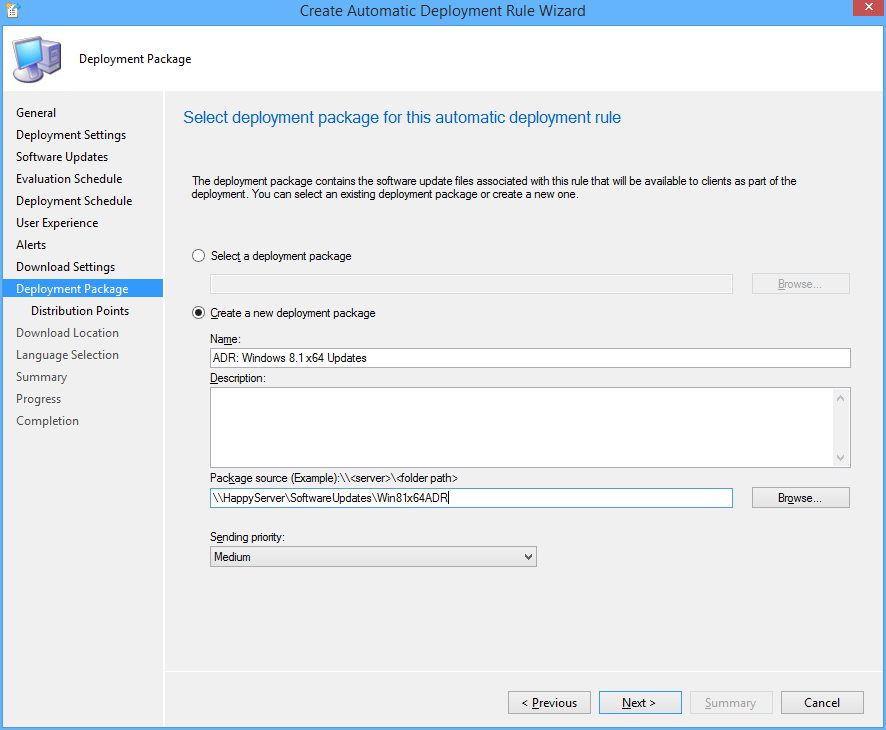
25. Name it 'ADR: Windows 8.1 x64 Updates' and select a UNC share for storage of the software updates.
26. Add Distribution Points.
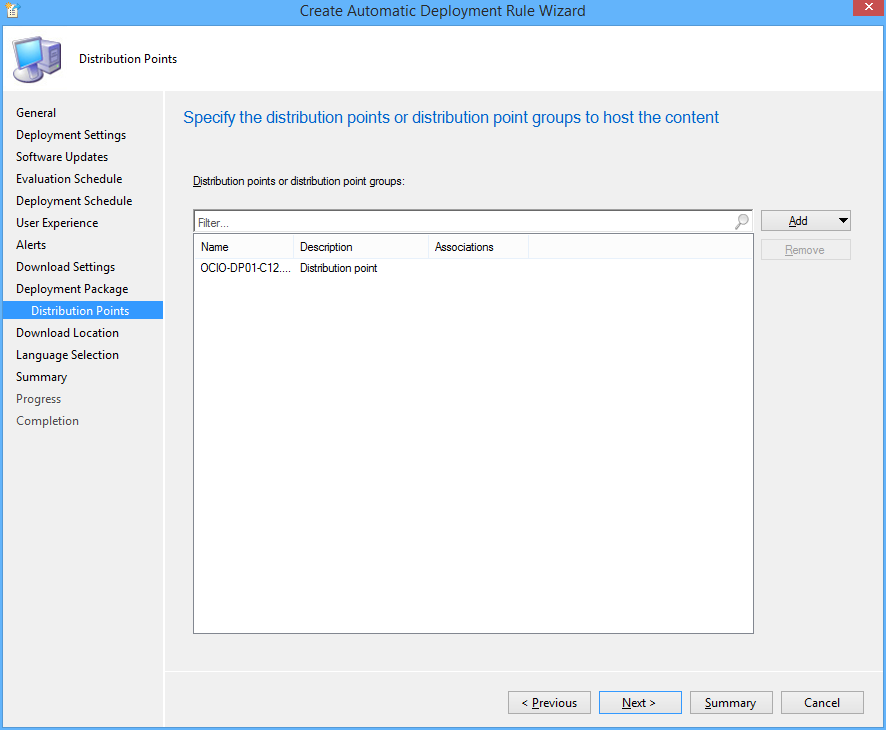
27. Click Next.
28. Click Next
29. Select desired languages, click Next

30. Click Next, then Close.
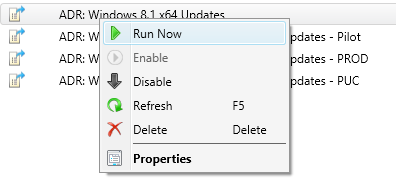
31. Right click on your newly created ADR and click 'Run Now'. You can monitor progress on the site server checking Program FilesMicrosoft Configuration ManagerLogsruleengine.log
32. Give it some time to download updates and distribute them then on the client machine run a machine policy update and verify updates install using Software Center

33. After having a play check out this post for some best practices to setting up all your Automatic Deployment Rules including Piloting your updates to a pilot group for 7 days.
34. Also check out this post to automate sending a report out on what updates are being deployed.

Create a compliance baseline to remove a folder

In this example we are killing the Silverlight start menu folder enabling us to use the Windows Updates while keeping the start menu clean.
Create the Configuration Item
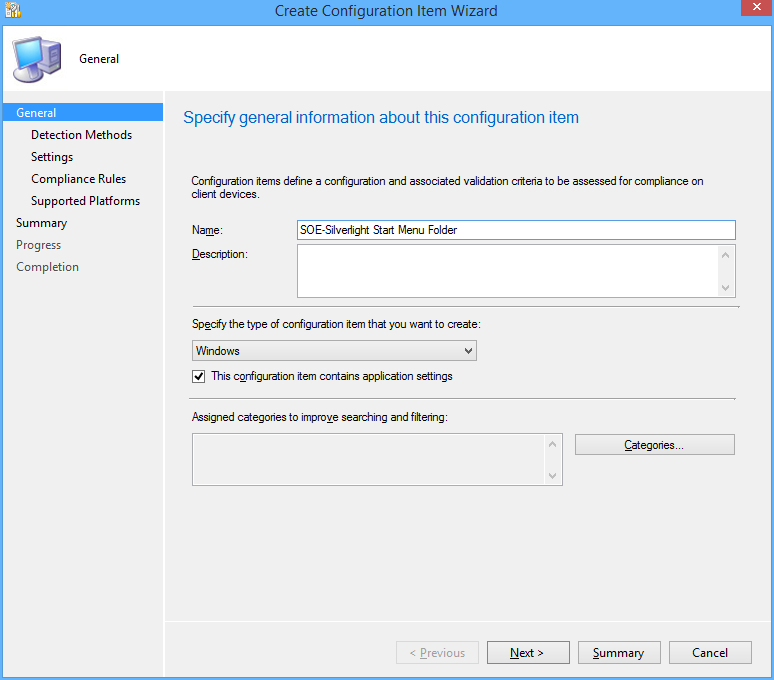
1. In the console click Create Configuration Item
2. Name your configuration item, click 'This configuration item contains application settings' and click Next
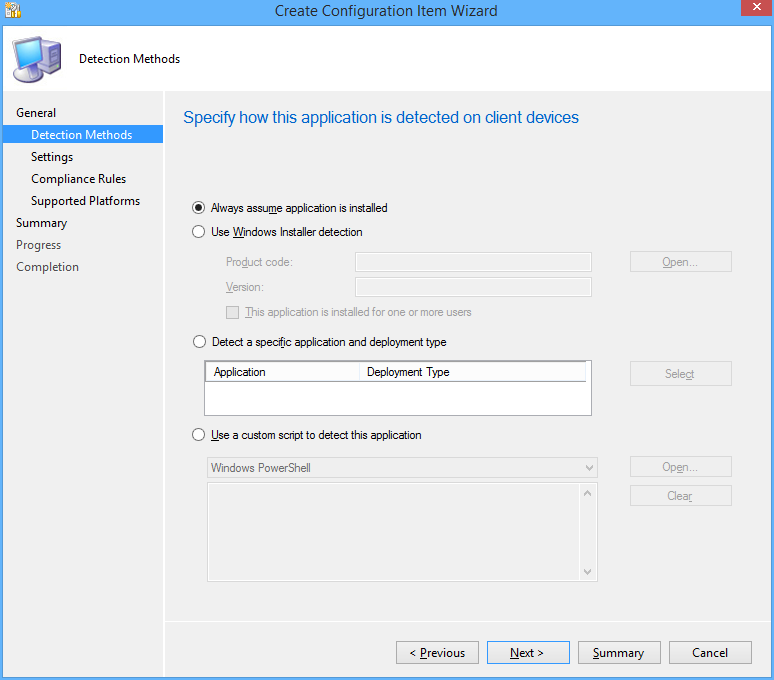
3. Select 'Always assume application is installed' and click Next
4. Click New, Change the Setting type to 'Script'. Change the Data type to 'String'. Also name your Setting.
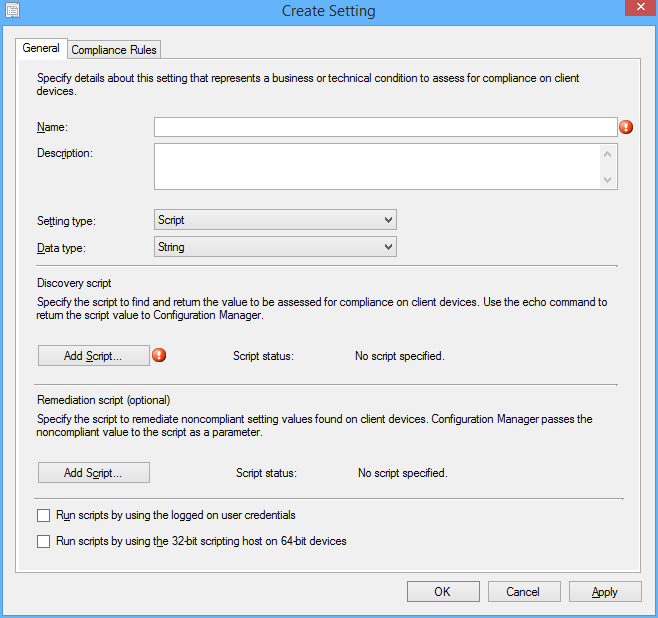
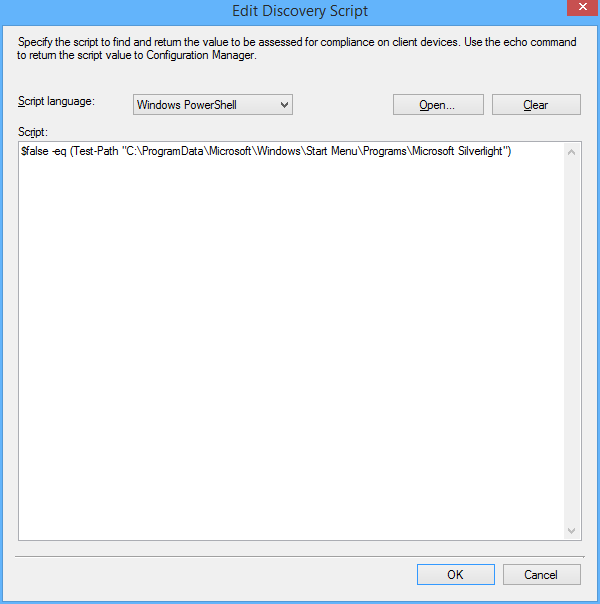
5. Under Discovery Script click 'Add Script'
6. Ensure Script language is 'Windows Powershell' and paste the following
$false -eq (Test-Path "C:ProgramDataMicrosoftWindowsStart MenuProgramsMicrosoft Silverlight")
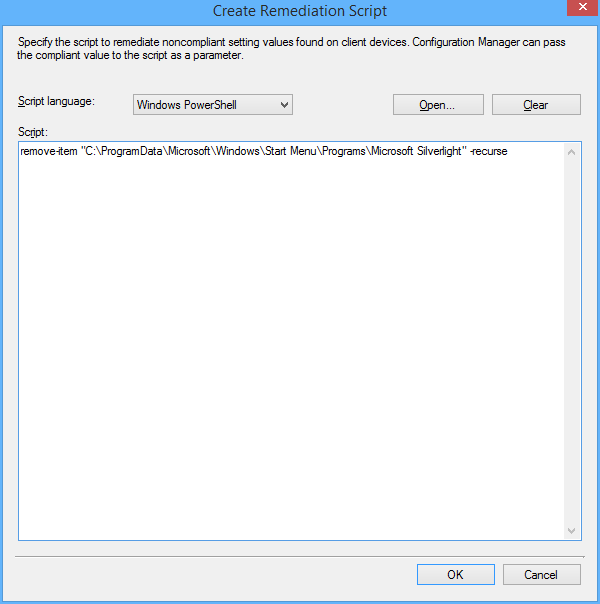
7. Under Remediation Script click 'Add Script'
8. Ensure Script language is 'Windows Powershell' and paste the following
remove-item "C:ProgramDataMicrosoftWindowsStart MenuProgramsMicrosoft Silverlight" -recurse
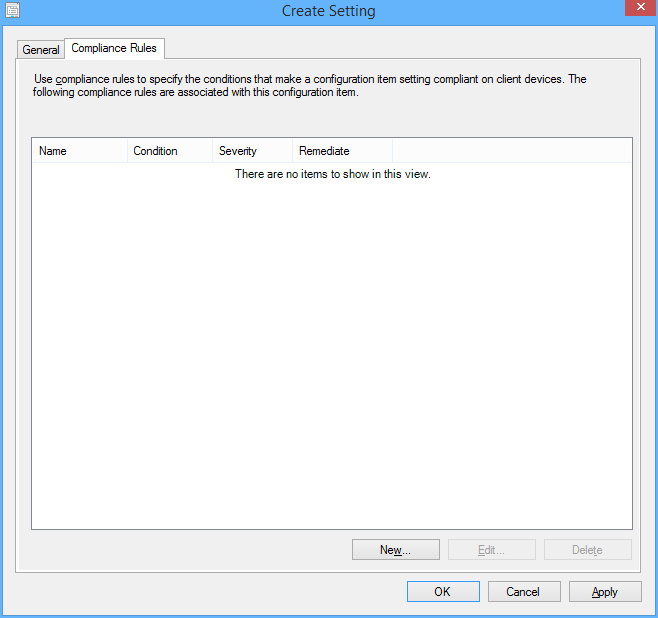
9. Click 'Ok', then click the 'Compliance Rules' tab
10. Click 'New'
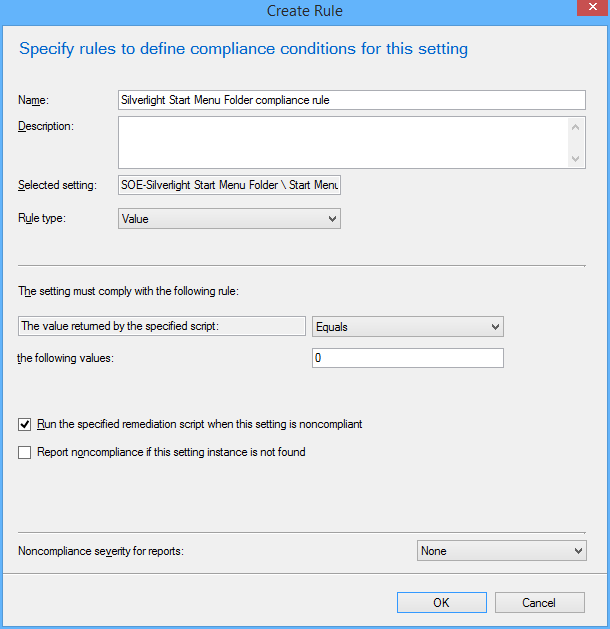
11. Configure the Compliance rule: Set 'Rule type' to Value. Set the Value returned to equal 0. Click 'Run the specified remediation script when this setting is non complaint'.
12. Click 'OK' then 'Next', 'Next' on the Wizard Screen.
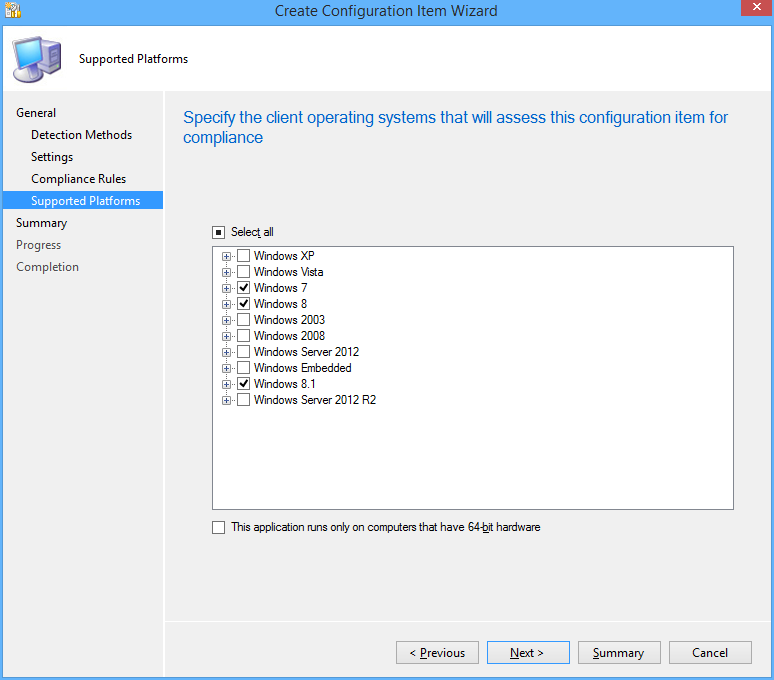
13. Choose the OS Environments for compliance
14. Click 'Next' until you finish the Wizard.
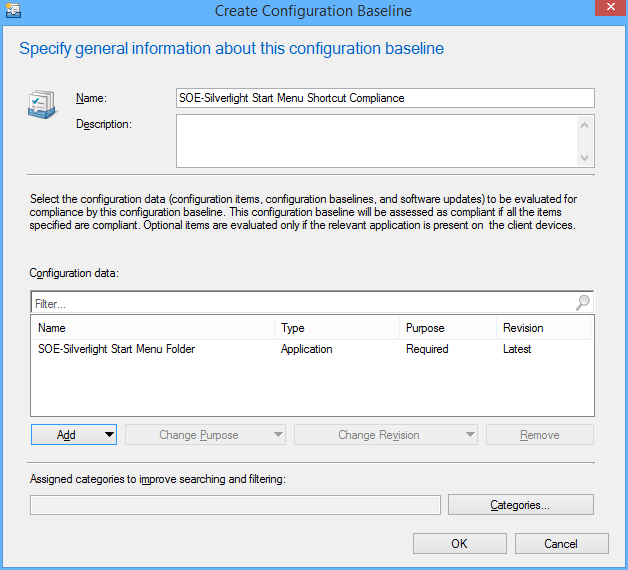
15. Under Configuration Baselines click 'Create Configuration Baseline' and add the configuration item we just created, then click 'OK'
16. The Baseline is now ready to be deployed to your test collection!
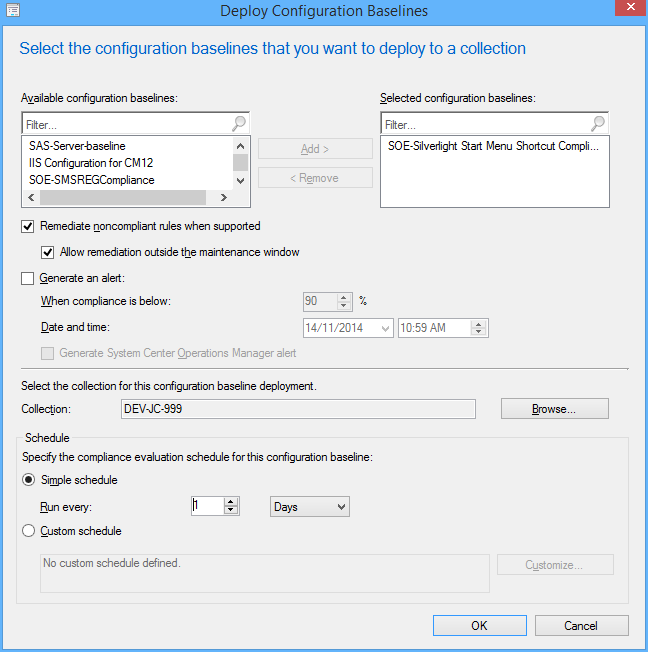
Right click and select Deploy, Enable the remediation options and change the Schedule if needed.
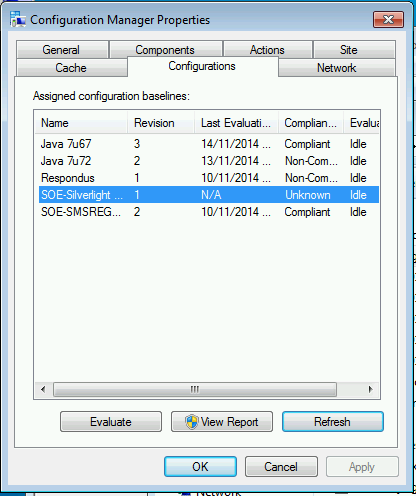
17. On your test machine, request a new machine policy, then click on the Components tab. Clicking Refresh should show the new baseline which you can then evaluate.
18. Within a minute the remediation runs and the folder disappears!

How I automate patching desktops

It takes a long time to setup but worth it, computers should
not get policies they don’t need, at some point things will start stuffing up. I
have split desktops into 3 categories that suit our environment. Pilot get updates straight away and will reboot at night. Prod and PUC get updates 7 days later and have different reboot requirements.
|
Group |
Deadline |
User notifications |
Deadline behaviour outside maintenance window |
Device restart behaviour |
|
Pilot |
Asap |
All |
SW Updates Install |
Yes |
|
Prod |
7 days |
None |
SW Updates Install |
Suppressed |
|
PUC (Public Use computers such as Labs) |
7 days |
None |
SW Updates Install |
Yes |
I then split these groups into collections based on OS or
Office version requirements, so we have Office 2007, Office 2010, Office 2013,
Windows XP, Windows 7 x86, Windows 7 x64, Windows 8 x64.
A Pilot, PUC and PROD collection should be made so you can
limit the collections with it. These collections will vary in your environment.
Based on that you should have 21 collections - see ‘rules
and queries’ at the end for the messy queries
|
SUM-WORKSTATIONS-PROD–Office 2007 |
SUM-WORKSTATIONS-PROD–Office 2010 |
SUM-WORKSTATIONS-PROD–Office 2013 |
SUM-WORKSTATIONS-PROD–Windows XP |
|
SUM-WORKSTATIONS-PROD–Windows 7 x86 |
SUM-WORKSTATIONS-PROD–Windows 7 x64 |
SUM-WORKSTATIONS-PROD–Windows 8 x64 |
|
|
SUM-WORKSTATIONS-PILOT–Office 2007 |
SUM-WORKSTATIONS- PILOT–Office 2010 |
SUM-WORKSTATIONS- PILOT–Office 2013 |
SUM-WORKSTATIONS- PILOT–Windows XP |
|
SUM-WORKSTATIONS- PILOT–Windows 7 x86 |
SUM-WORKSTATIONS- PILOT–Windows 7 x64 |
SUM-WORKSTATIONS- PILOT–Windows 8 x64 |
|
|
SUM-WORKSTATIONS-PUC–Office 2007 |
SUM-WORKSTATIONS- PUC–Office 2010 |
SUM-WORKSTATIONS- PUC–Office 2013 |
SUM-WORKSTATIONS- PUC–Windows XP |
|
SUM-WORKSTATIONS- PUC –Windows 7 x86 |
SUM-WORKSTATIONS- PUC–Windows 7 x64 |
SUM-WORKSTATIONS- PUC–Windows 8 x64 |
Update:
Limit your pilot collections to a group of user's primary computers using this collection query
[code language="sql"]
Select SMS_R_SYSTEM.ResourceID,SMS_R_SYSTEM.ResourceType,SMS_R_SYSTEM.Name,SMS_R_SYSTEM.SMSUniqueIdentifier,SMS_R_SYSTEM.ResourceDomainORWorkgroup,SMS_R_SYSTEM.Client FROM SMS_R_System JOIN SMS_UserMachineRelationship ON SMS_R_System.Name=SMS_UserMachineRelationship.ResourceName JOIN SMS_R_User ON SMS_UserMachineRelationship.UniqueUserName=SMS_R_User.UniqueUserName WHERE SMS_UserMachineRelationship.Types=1 AND SMS_R_User.UserGroupName="DOMAIN\SCCM Software Updates Pilot User Group"
[/code]
Thanks Powersheller
Next you create a Software Update Group (the current
baseline of approved updates) for each Office/OS Version and a deployments for
each based on the rules from the first table.
Then you create Automatic Deployment rules for each
collection based (to run on Patch Tuesday/Wednesday Australia time) on the
rules from above and what type updates you want released in the last 3 weeks. They should be set to create a new software update group each time. See ‘rules and queries’ for what I have used.
You can also create an EndPoint Protection definitions ADR, however that should be set to use the existing software update group as the updates always superseed each time.
Rules and Queries:
|
Query Name |
Query |
|
Office 2007 |
See attachment |
|
Office 2010 |
See attachment |
|
Office 2013 |
See attachment |
|
Windows XP |
See attachment |
|
Windows 7 x86 |
See attachment |
|
Windows 7 x64 |
See attachment |
|
Windows 8 x64 |
See attachment |
|
Rule Name |
Rules |
|
Office 2007 |
Date Released or revised: Last 3 weeks Product: “Office 2007” Title: 32-Bit Update Classification: “Critical Updates” OR “Security Updates” OR |
|
Office 2010 |
Date Released or revised: Last 3 weeks Product: “Office 2010” Title: 32-Bit Update Classification: “Critical Updates” OR “Security Updates” OR |
|
Office 2013 |
Date Released or revised: Last 3 weeks Product: “Office 2013” Title: 32-Bit Update Classification: “Critical Updates” OR “Security Updates” OR |
|
Windows 7 x86 |
Date Released or revised: Last 3 weeks Product: “Windows 7” Title: -x64 Update Classification: “Critical Updates” OR “Security Updates” OR |
|
Windows 7 x64 |
Date Released or revised: Last 3 weeks Product: “Windows 7” Title: x64 Update Classification: “Critical Updates” OR “Security Updates” OR |
|
Windows 8 x64 |
Date Released or revised: Last 3 weeks Product: “Windows 8” OR “Windows 8.1” Title: x64 Update Classification: “Critical Updates” OR “Security Updates” OR |