December, 2014
Format failed (0x80070057) during task sequence.
Update:
If this is happening to you I recommend importing the boot wim again creating a new one and only adding the network drivers (in the surface pro 3 case) and test using that boot wim with a copy of your task sequence. Then add existing sata/network drivers you need for other devices using latest versions.
I recieved an email from someone that has the same issue, he noticed that Microsoft ships with either a Hynix SSD or a Samsung SSD. The Samsung SSD has never had any issues. From my SCCM data we have 20% Hynix drives - possibly due to change of hard drive supply or shortage, I'm not sure. This will explain why you may be going crazy not understanding why encountering imaging issues after having success.
In this scenario the formatting of the disk fails and then the disk just dissapears even in diskpart until next reboot.
Solution is to get the correct SATA driver for the device. This happened on one of the Surface Pro 3's yet all the others imaged fine. Using the driver provided by the driver pack in the boot wim the task sequence was able to successfully format the disk.
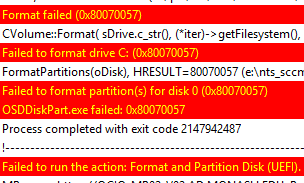
Text from the smsts.log:
|
1 2 3 4 5 6 7 8 9 10 |
Format failed (0x80070057) OSDDiskPart 15/12/2014 4:33:23 PM 864 (0x0360) CVolume::Format( sDrive.c_str(), (*iter)->getFilesystem(), (*iter)->getVolumeName().c_str(), 0, (*iter)->getIsQuickFormat() ? CVolume::foptQuick : 0, FormatProgressCallback, NULL), HRESULT=80070057 (e:nts_sccm_releasesmsclientosdeploymentosddiskpartmain.cpp,1003) OSDDiskPart 15/12/2014 4:33:23 PM 864 (0x0360) Failed to format drive C: (0x80070057) OSDDiskPart 15/12/2014 4:33:23 PM 864 (0x0360) FormatPartitions(oDisk), HRESULT=80070057 (e:nts_sccm_releasesmsclientosdeploymentosddiskpartmain.cpp,1279) OSDDiskPart 15/12/2014 4:33:23 PM 864 (0x0360) Failed to format partition(s) for disk 0 (0x80070057) OSDDiskPart 15/12/2014 4:33:23 PM 864 (0x0360) OSDDiskPart.exe failed: 0x80070057 OSDDiskPart 15/12/2014 4:33:23 PM 864 (0x0360) Process completed with exit code 2147942487 TSManager 15/12/2014 4:33:23 PM 1088 (0x0440) !--------------------------------------------------------------------------------------------! TSManager 15/12/2014 4:33:23 PM 1088 (0x0440) Failed to run the action: Format and Partition Disk (UEFI). This is usually caused by a problem with the program. Please check the Microsoft Knowledge Base to determine if this is a known issue or contact Microsoft Support Services for further assistance. The parameter is incorrect. (Error: 80070057; Source: Windows) TSManager 15/12/2014 4:33:23 PM 1088 (0x0440) |

How To: Create Automatic Deployment Rules for Patch Tuesday Software Updates

Automatic deployment of updates is one of the best features of SCCM. Automation in general is awesome.
The best way to use Automatic deployment rules (ADR) is to have them run on Patch Tuesday which is the second Tuesday of the month when Microsoft releases their updates generally before 11:00 PST/PDT (I am Australian based so I set ADRs to run Wednesday Morning).
In this example I am deploying Windows 8.1 x64 critical, security and 'updates' updates.
1. Under the Software Library Node Software Updates click Automatic Deployment Rules then select 'Create Automatic Deployment Rule' from the Ribbon

2. In the Wizard name your ADR 'ADR: Windows 8.1 x64 Updates'
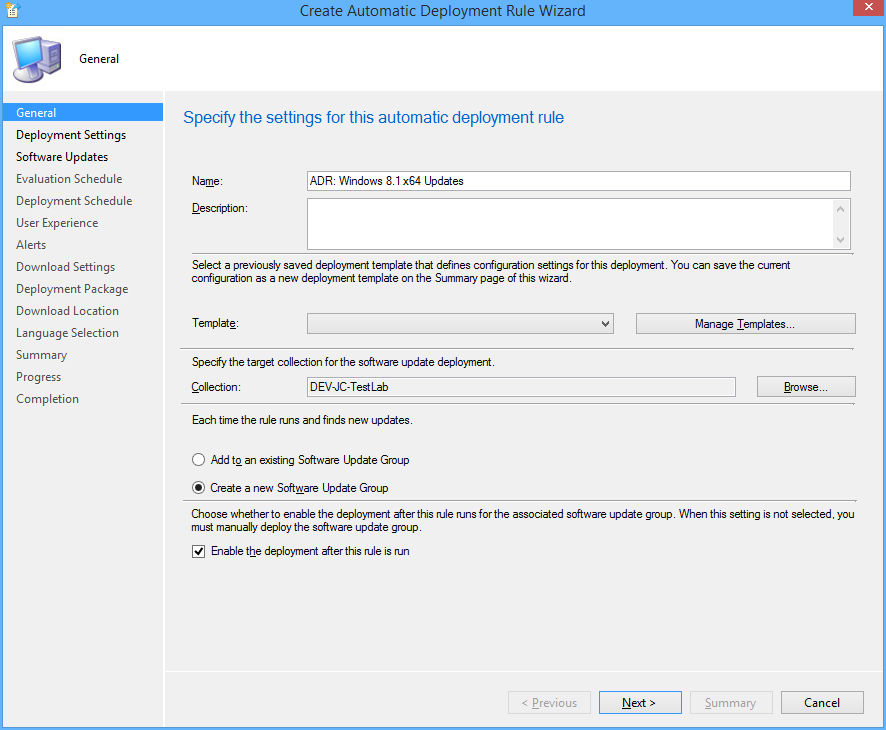
3. Click Browse and select your target collection
4. Change the Option to 'Create a new Software Update Group'. The other Option should really be called 'Wipe previous updates from Software Update Group' as that's what it does.
5. Click Next.
6. Ensure 'Automatically deploy all software updates found by this rule, and approve any license agreements. Also optionally enable the Wake-on-LAN tickbox.
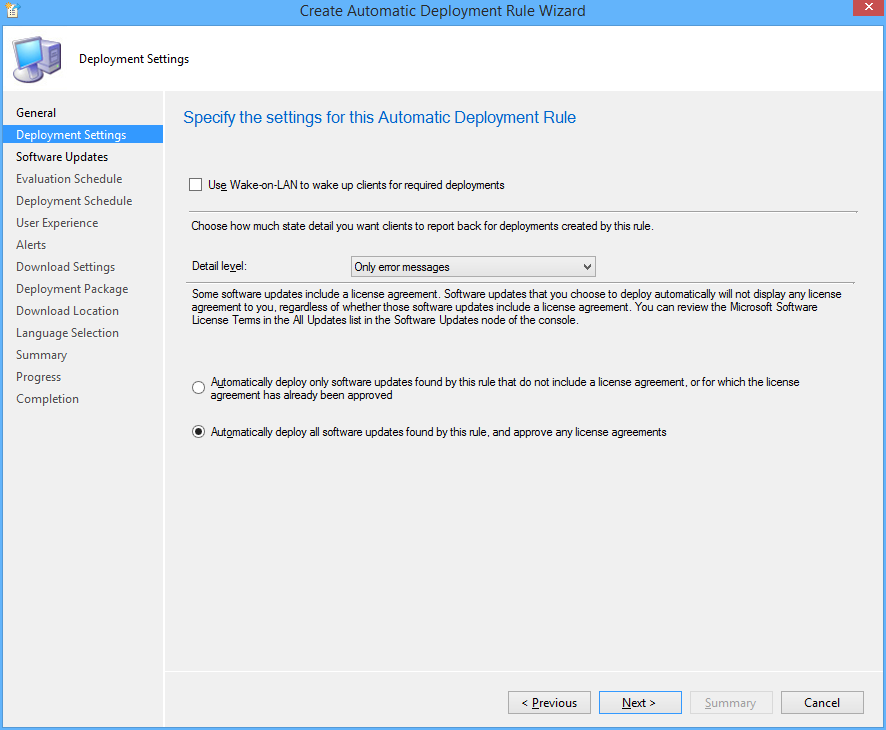
7. Click Next
8. Choose Date Released or Revised, set it to Last 3 weeks.
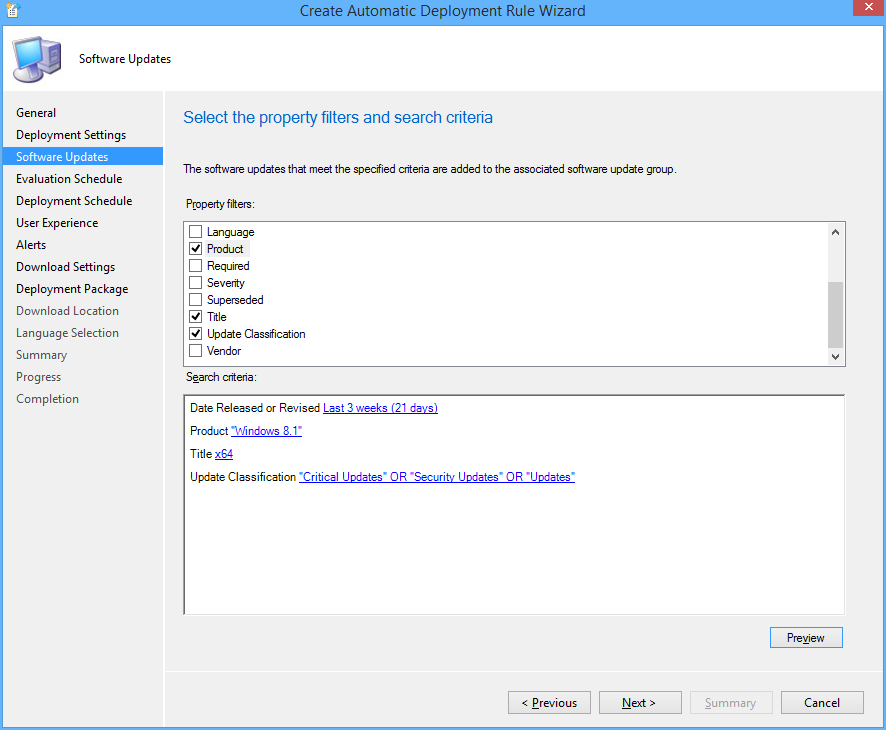
9. Choose Product, set it to 'Windows 8.1'
10. Choose Update Classification, set it to “Critical Updates” OR “Security Updates” OR
“Updates”
11. Choose Title, set it to 'x64'. This is to filter out x86 updates.
12. Click Preview, if you are doing this on Patch Tuesday you will see all the applicable updates that will be deployed. Otherwise you can change the date range for the example.

13. Click Next
14. Choose 'Run the rule on a schedule.

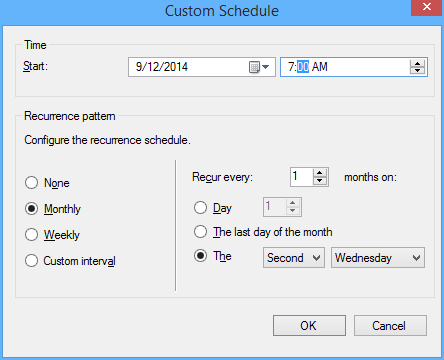
15. Click Customize and choose to run the rule every second Tuesday at the appropriate time depending what time zone you are in. Click OK (Not to important for the demo as you can run it manually)
16. Click Next
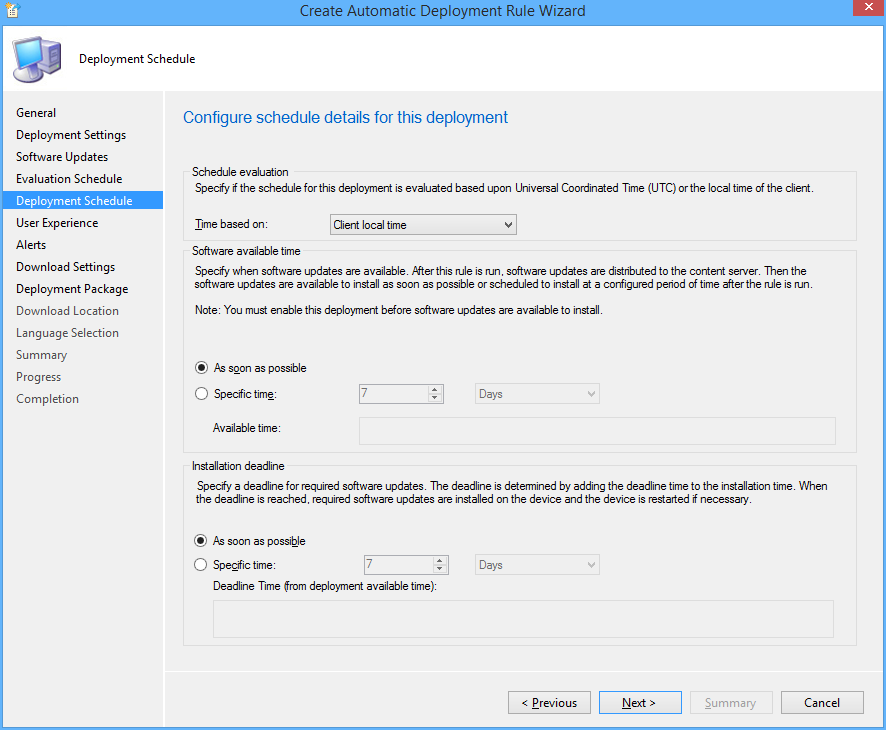
17. Customize the Deadline to 'As soon as possible'.
18. Click Next
19. Change the User Experience to 'Display in Software Center and show all notifications'
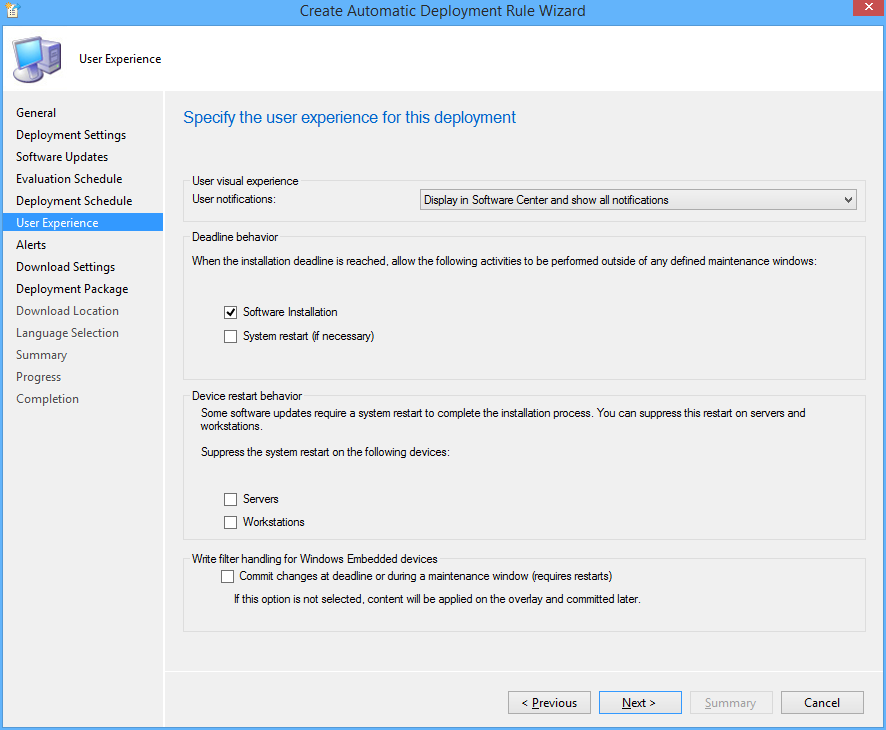
20. Tick 'Software Installation'.
21. Click Next.
22. Click Next.
23. Click Next
24. Choose Create a new deployment package.
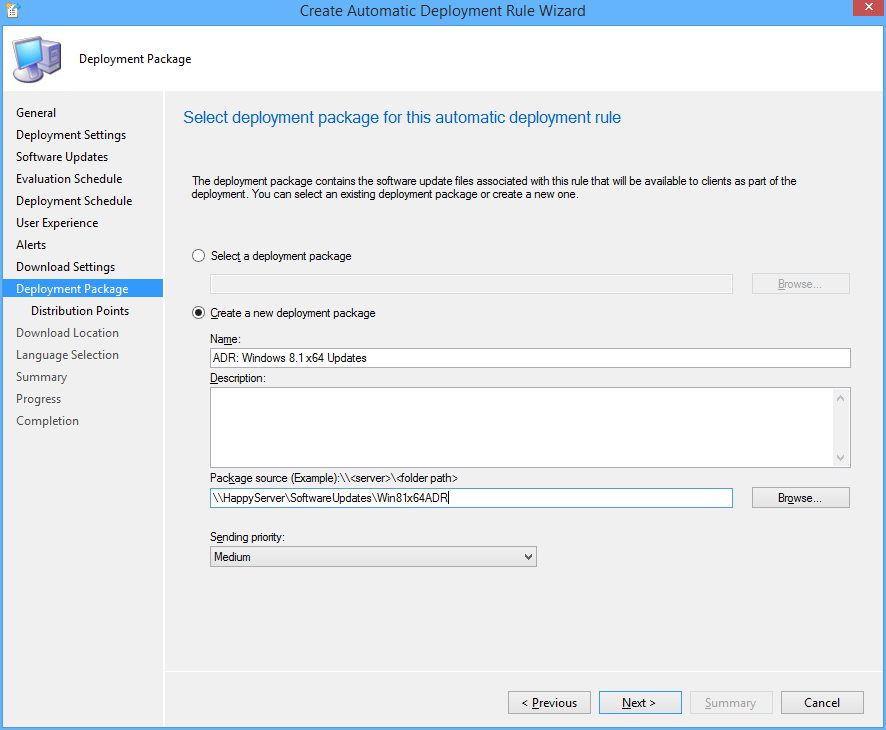
25. Name it 'ADR: Windows 8.1 x64 Updates' and select a UNC share for storage of the software updates.
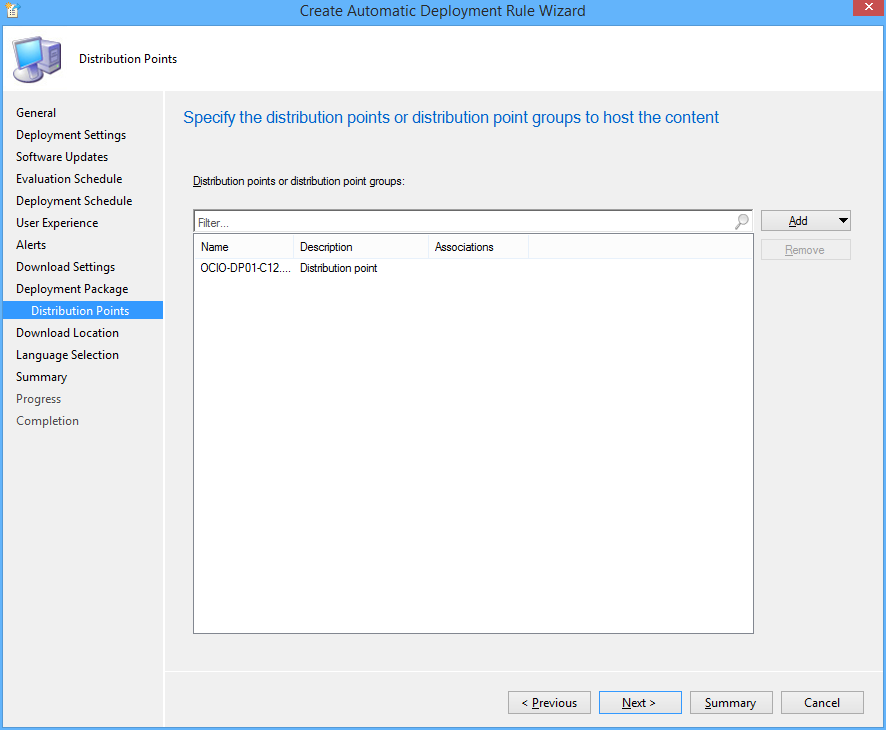
26. Add Distribution Points.
27. Click Next.
28. Click Next
29. Select desired languages, click Next

30. Click Next, then Close.
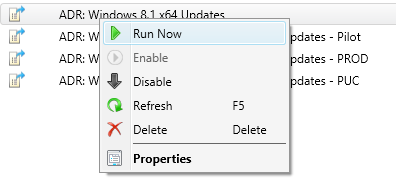
31. Right click on your newly created ADR and click 'Run Now'. You can monitor progress on the site server checking Program FilesMicrosoft Configuration ManagerLogsruleengine.log
32. Give it some time to download updates and distribute them then on the client machine run a machine policy update and verify updates install using Software Center

33. After having a play check out this post for some best practices to setting up all your Automatic Deployment Rules including Piloting your updates to a pilot group for 7 days.
34. Also check out this post to automate sending a report out on what updates are being deployed.
KB: Temporary partition to stage boot wim on UEFI booted devices fails.
When not using the latest version of bootable media and the system is not partitioned SCCM is meant to create a temporary partition to stage the correct boot wim. What actually happens is it just creates 1 big NTFS partition.
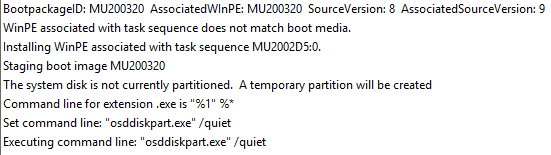
What actually happens is it just creates 1 big NTFS partition.

Then it checks the for a system partition and bombs out.

http://technet.microsoft.com/en-au/library/hh824839.aspx states that the System partition must be formatted FAT32, SCCM is formatting it NTFS so it never gets recognised as a system partition.
For UEFI the EFI & MSR volume should also be created to make system partition readable and bootable.
I created a hotfix request, will update this post if anything comes of it.